Integrate Inline Scanner
info
See Local Scanning Quickstart for a step-by-step guide for each supported operating system.
Overview
There are many steps involved in building and deploying a containerized application, a complete container image lifecycle approach is key to managing software supply chain risks. The Lacework inline scanner allows you to integrate Lacework security capabilities into your software supply chain workflows by allowing you to scan and assess Docker container images for vulnerabilities without checking them into a container registry.
The inline scanner container registry integration performs an inline scan outside of Lacework. You can then configure the inline scanner to send a request to Lacework to assess the collected data. After you create an inline scanner integration in the Lacework Console, you can download and deploy the inline scanner as a binary within your development tool chain.
The inline scanner is triggered on an on-demand basis within build chain workflows. The trigger could be, for example, the start of a new container image build in the CI pipeline or a developer wants to assess a build on their local machine. The inline scanner collects data about the container image using your configured settings about what data to collect. Using the associated server token that was created when you integrated the inline scanner in the Lacework Console, the inline scanner initiates an API request for assessment by Lacework. After the token is authorized, Lacework assesses the file data. View the results on the Vulnerability Assessment page in the Lacework Console. You can configure additional output types.

You can download the inline scanner software from the Lacework GitHub Repository.
Default Scanning Quotas
- The inline scanner supports a maximum of 120 container image assessments per hour for each Lacework account.
- For each registry integration, the inline scanner performs a maximum of 60 image assessments per hour for each integration.
info
Contact Lacework Support if you are concerned about hitting these limits as they can be increased upon request.
Upgrades
When installing a new version of the inline scanner, be aware of the following:
The existing configuration will not be overwritten, including environment variables. As such, any new default behavior will not become active unless you explicitly configure it after upgrading.
For example, from v0.2.4 onwards, language libraries are scanned by default. If this feature was previously disabled in your configuration, it will remain disabled. See the configure scanner section for methods to enable it.
Delete an Existing Configuration (Optional)
If you wish to install a new version of the inline scanner and remove any previous configuration, including any authentication values, use the configure reset command after installing the new release.
This will also activate any new defaults included in the new release.
Save Evaluation Results in the Lacework Console
After upgrading the Lacework scanner from 0.1.x to 0.2, the inline scanner no longer saves evaluation results to the Lacework Console by default.
To keep the same behavior as before, perform one of the following options:
- Run the
configure datacommand and entertruefor the "Save results in platform" option. - Use the
LW_SCANNER_SAVE_RESULTS=trueenvironment variable on your local or CI/CD system. - Use the
--saveflag when running theimage evaluateorimage scancommands.
Scan Language Libraries
From v0.2.4 onwards, inline scanner releases scan language libraries by default.
To disable this feature, use one of these three methods:
- Run the
lw-scanner configure scannercommand and enterfalsewhen the Scan Library packages prompt appears. - Set the following environment variable in your local or CI/CD system:
export LW_SCANNER_DISABLE_LIBRARY_PACKAGES_SCANNING=true - Use the
--disable-library-package-scanningflag when running theimage evaluateorimage scancommands.
Inline Scanner Support
The inline scanner can be run on the following operating systems:
- Linux
- Mac
- Windows
For information about package assessment, see the Package Assessment Support section.
CPU and Memory Resources
The following two sections outline the amount of CPU and memory resources needed when running the Inline Scanner.
note
The Inline Scanner uses the local system resources available to it and there is no method of allocating resources directly.
Memory Recommendation
Maximum image size + 500MB additional headroom.
Example: 3GB image + 0.5GB = 3.5GB Memory
CPU Recommendation
Maximum of two core CPU is sufficient for most workloads.
Navigate to Inline Scanner Integration
- Log in to the Lacework Console with an account with admin permissions.
- Navigate to Settings > Integrations > Container registries.
- Click + Add New.
- Click Inline Scanner.
- Click Next.
- Follow the steps in the next section.
Create an Inline Scanner Integration in Lacework
Creating an integration in the Lacework Console is the first step in setting up the inline scanner. To create an integration, follow these steps:
- In the Lacework Console, go to Settings > Integrations > Container registries.
- Click + Add New.
- Select Inline Scanner and click Next.
- Name the integration and complete any optional settings.
- Click Save.
This displays a window that provides the inline scanner’s download URL and authorization token. - Click the URL’s Copy to clipboard icon and paste it into a new browser window.
This is where you download the inline scanner. - Click the Authorization Token’s Copy to clipboard icon.
This is the integration’s associated token. You need this to configure the inline scanner.
After you save the integration, its name displays on the Integrations Container Registry page. For next steps, continue to Deploy the Inline Scanner.
Inline Scanner Settings
| Setting Name | Description |
|---|---|
| Name | Specify a unique name to display for the integration in the Lacework Console. |
| Limit Number of Scans per Hour (for this Integration) | Enter the maximum number of scans per hour that this integration can perform. |
| Identifier Tags | Specify tags as key:value pairs. |
Obtain the Inline Scanner and Authorization Token
If you don't already have the inline scanner or integration server authorization token, follow these steps to get them:
- Navigate to Settings > Integrations > Container registries.
- Click the name of the inline scanner integration.
This opens the integration’s details. - Click the URL’s Copy to clipboard icon and paste it into a new browser window.
This is where you download the inline scanner. - Click the Authorization Token’s Copy to clipboard icon.
This is the integration’s associated token. You need this to configure the inline scanner.
Deploy the Inline Scanner
After you download the inline scanner, place it in a location of your choice and make it executable.
tip
Add the inline scanner binary to your operating system PATH to execute it as lw-scanner throughout your system.
If not adding the binary to your PATH, you will need to adjust the command examples shown in this article.
./lw-scanner-linux-arm64
lw-scanner-windows-amd64.exe
For next steps, continue to the Configuration Commands section. Ensure you run the configure auth command.
Configuration Commands
This section provides information about the available configuration commands. In the command line the values that display inside parentheses represent your current configuration settings.
There are also environment variables for configuring authentication, exporting data to Lacework, the scanner, version, and global flags that can be set as an alternative for some of these commands. In addition, the Lacework scanner will honor the standard Linux HTTP_PROXY and HTTPS_PROXY environment variables if they are set in your local or CI/CD system.
configure auth
After you create the inline scanner integration, you must run the configure auth command once. You can run this command again later if you need to update the configuration. For configuration authentication, run this command:
lw-scanner configure auth
Provide the following information:
- Lacework account name
For example, if your login URL is mycompany.lacework.net, the account name is mycompany. For example, if your login URL is mycompany.fra.lacework.net, the account name is mycompany.fra. - Authorization token
Copy and paste the token from the inline scanner integration created in the Lacework Console.
Configure Authentication Using Environment Variables
You can also use environment variables to set the authorization token and account name for the inline scanner. To configure environment variables in your local system, run this command:
export VARNAME = "myvalue"
where:
VARNAME is the variable name.
myvalue is the variable value.
You can use the following environment variables in your local or CI/CD system:
| Variable Name | Value |
|---|---|
| LW_ACCOUNT_NAME | Your Lacework account name. For example, if your login URL is mycompany.lacework.net, the account name is mycompany. For example, if your login URL is mycompany.fra.lacework.net, the account name is mycompany.fra. |
| LW_ACCESS_TOKEN | Authorization token. Copy and paste the token from the inline scanner integration created in the Lacework Console. |
configure data
The configure data command configures how the inline scanner handles data, such as where to store data and if it is saved in a file. To configure data handling, run this command:
lw-scanner configure data [flags]
Provide the following information:
- Data storage directory
Enter the directory where you want to store all inline scanner command output. Note that the-d, --data-directoryglobal flag overrides the directory defined here. - Store evaluation in file - true/false
True stores assessment data in a file.
False (default) does not store assessment data in a file. - Store manifest in file - true/false
True stores manifest data in a file.
False (default) does not store manifest data in a file. - Save results in platform - true/false
True sends evaluation results to the Lacework Console.
False (default) does not send evaluation results to the Lacework Console.
Save Results in Platform using Environment Variable
Configure Save results in platform to true by using an environment variable on your local or CI/CD system:
export LW_SCANNER_SAVE_RESULTS=true
configure logging
The configure logging command configures how the inline scanner handles logging data, such as where to store logs and the logging level. To configure logging, run this command:
lw-scanner configure logging
- Log eval - debug/info/warn/error
Enter the minimum vulnerability level to log. For example, if set to info, then info, warning, and error level vulnerabilities are logged. - Log file directory
Enter the directory where you want to store inline scanner logs. Note that the-l, --log-directoryglobal flag overrides the directory defined here.
configure reset
The configure reset command resets all inline scanner configuration settings. To reset configuration settings, run this command:
lw-scanner configure reset
configure scanner
This feature is enabled by default. Find out more about this feature in the Language Libraries Support section.
note
Prior to v0.2.4, inline scanner releases will not have this feature enabled by default.
The configure scanner command allows you to enable or disable library package scanning for non-OS programming languages.
To enable or disable library scanning, run this command:
lw-scanner configure scanner
When the "Scan Library packages" prompt appears, enter true or false.
Configure Scanner using Environment Variable
Enable or disable library package scanning for non-OS programming languages by setting the following environment variable:
export LW_SCANNER_DISABLE_LIBRARY_PACKAGES_SCANNING=false
export LW_SCANNER_DISABLE_LIBRARY_PACKAGES_SCANNING=true
Use the environment variable in your local or CI/CD system.
Disable Language Library Scanning with Flag
You can disable language library scanning by adding the --disable-library-package-scanning flag to the image evaluate command in your local or CI/CD system:
lw-scanner image evaluate ${IMAGE_NAME} ${IMAGE_TAG} --disable-library-package-scanning
See Flags for image evaluate for general usage of the --disable-library-package-scanning flag.
configure view
The configure view command displays all inline scanner configuration information. To view the current configuration, run this command:
lw-scanner configure view
Example configuration output:
Current config :
{
  "auth": {
    "account_name": "myaccountname",
    "integration_access_token": "_123456789abcdef123456789abcd"
  },
  "logging": {
    "log_level": "error",
    "log_file_directory_path": ""
  },
  "tags": {
    "build_id": "dev_build",
    "build_plan": "dev_machine",
    "hostname": "My-MacBook-Pro.local",
    "source": "lacework_inline_scanner",
    "user": "Firstname Lastname"
  },
  "data": {
    "data_file_directory": "",
    "store_evaluations_in_file": false,
    "store_manifest_in_file": false,
    "output_format": "json"
  }
}
configure version
The configure version command lets you disable the update checks that occur every time you run a lw-scanner command. To disable update checks, run this command:
lw-scanner configure version
When the "Disable Update checks" prompt appears, enter true.
Configure Version using Environment Variable
Disable update checks by setting the following environment variable:
export LW_SCANNER_DISABLE_UPDATES=true
Use the environment variable in your local or CI/CD system.
Global Flags
The inline scanner provides the following global flags:
-d, --data-directory stringspecify the directory path to store command outputs. Note that this flag overrides the directory set by theconfigure datacommand.--debugcreates a debug log file and enables debug logging.-l, --log-directory stringspecify the directory path to store inline scanner logs. Note that this flag overrides the directory set by theconfigure loggingcommand.--log-stdoutenables logging to stdout in your console.
Example command:
lw-scanner image evaluate image_name image_tag -d=/abc/def/
This example command sets the directory that stores command outputs (such as assessments, manifests) to /abc/def/.
Global Flags using Environment Variables
Use the following environment variables for the specified global config options:
export LW_SCANNER_DATA_DIRECTORY=<data-directory-path>
export LW_SCANNER_ENABLE_DEBUGGING=<true|false>
export LW_SCANNER_LOGGING_DIRECTORY=<log-directory-path>
export LW_SCANNER_ENABLE_STDOUT_LOGGING=<true|false>
Scan Java Images Offline
By default, the Inline Scanner accesses https://search.maven.org/solrsearch/select when searching for Maven Java dependencies/jars. If this Maven site is down, the Inline Scanner can fail with EOF and 504 timeouts.
Use the following environment variable if you want to stop the Inline Scanner from accessing https://search.maven.org/solrsearch/select for Maven Java dependencies:
JAVA_OFFLINE_MODE=true
image evaluate
The image evaluate command scans the container image to collect package information and then assesses the data. Assessment results are available in the Lacework Console, and may also be printed to the command line in tabular format depending on the verbose mode.
To perform a scan and assessment, run one of the following commands:
lw-scanner image evaluate image_name image_tag [flags]
lw-scanner image evaluate image_name:image_tag [flags]
lw-scanner image evaluate image_name image_digest [flags]
lw-scanner image evaluate image_name@image_digest [flags]
lw-scanner image evaluate image_name image_tag@image_digest [flags]
lw-scanner image evaluate image_name:image_tag@image_digest [flags]
Flags for image evaluate
note
Use the --docker-* flags to fetch image details from a registry and perform a remote scan. When using these flags, a remote scan will be performed even if the image is present locally.
-t, --access-token stringsets the Lacework access token / Authorization Token.-n, --account-name stringsets the Lacework account name. This can be found as part of the URL used to access your Lacework Console (for example:https://specializedsoftware.fra.lacework.net). However, do not include the.lacework.netportion when entering the account name.-i, --build-id stringsets the build ID from the CI system. This is included in the assessment data.-p, --build-plan stringsets the build plan name from the CI system. This is included in the assessment data.-c, --ci-buildtags the evaluation as a CI Build in the assessment report. This is automatically set if either--build-idor--build-planis defined.--disable-library-package-scanningwill disable image scans for non-OS library packages. This feature is enabled by default from v0.2.4 onwards. To find out more about this feature, see the Language Libraries Support section.- You can disable language library scanning even when it has been enabled by including this flag.
--docker-password stringsets the password to access the Docker registry.--docker-server stringsets the Docker server address.--docker-username stringsets the username to access the Docker registry.-e, --exceptionsincludes vulnerability exceptions in the evaluation report. It also adds the number of exceptions for the image per severity in a separate column.-f, --fixableprints and/or saves fixable vulnerabilities only.--htmlsaves the evaluation report as a local HTML file. By default, the file is saved in your current working directory in the format ofOS_TYPE-IMAGE_DIGEST_SHA256.html(use the--html-fileflag for a custom name).--html-file stringsets a custom file name for the HTML report (if the--htmlflag is used).-j, --jsonprints the evaluation results in JSON format (default is false). This offers the same output as the-v=falseoption.- If
-v=trueand-j=true, a JSON output is produced as the JSON flag overrides the verbose flag.
- If
--no-colorstops colors from being rendered in evaluation results when the--prettyoption is used.--no-pullwill stop the image from being pulled if not present locally. This will not apply if the--docker-*flags have been specified.--prettyrenders table borders and adds color to Severity column in the output of the evaluation results.-q, --quietwill stop the print progress in StdOut when using verbose mode (-v, --verbose).--registry stringsets the registry for the local image being scanned (use--docker-serverif you want to perform a remote scan of an image in a registry).info
The URI format must contain the schema prefix, for example:
https://index.docker.io, notindex.docker.io.When
--registryis not specified, theimage_nameis parsed to extract the registry. If the registry isn't referenced in theimage_name, the local image is parsed to discover the default registry.If the registry cannot be discovered in this way, it will be set to
local_image.-s, --savesaves the evaluation results to the Lacework Console (default is false).- Alternatively, use
export LW_SCANNER_SAVE_RESULTS=trueto set an environment variable on your local or CI/CD system. - The Lacework Console displays the image assessment source as lacework_inline_scanner if a
--registryis specified or local_image if a--registryis not specified.
- Alternatively, use
--simpledisplays evaluation results withoutIntroduced in LayerandFile Pathcolumns.--tags stringtakes a string of key value pairs to help identify or filter the evaluation results (example:server=myhost,foo=bar).-v, --verbosesets verbose mode.-v=true(default) prints the following: detailed process data in the command line in human-readable format and assessment data in tabular format.-v=falsedoes not print any process data in the command line and prints assessment data in JSON format.
-w, --wideprints and/or saves more detailed data in evaluation results (default true).
Container Vulnerability Policy Flags
See the Container Vulnerability Policy Support section for additional flags that can be used to evaluate images based on policies.
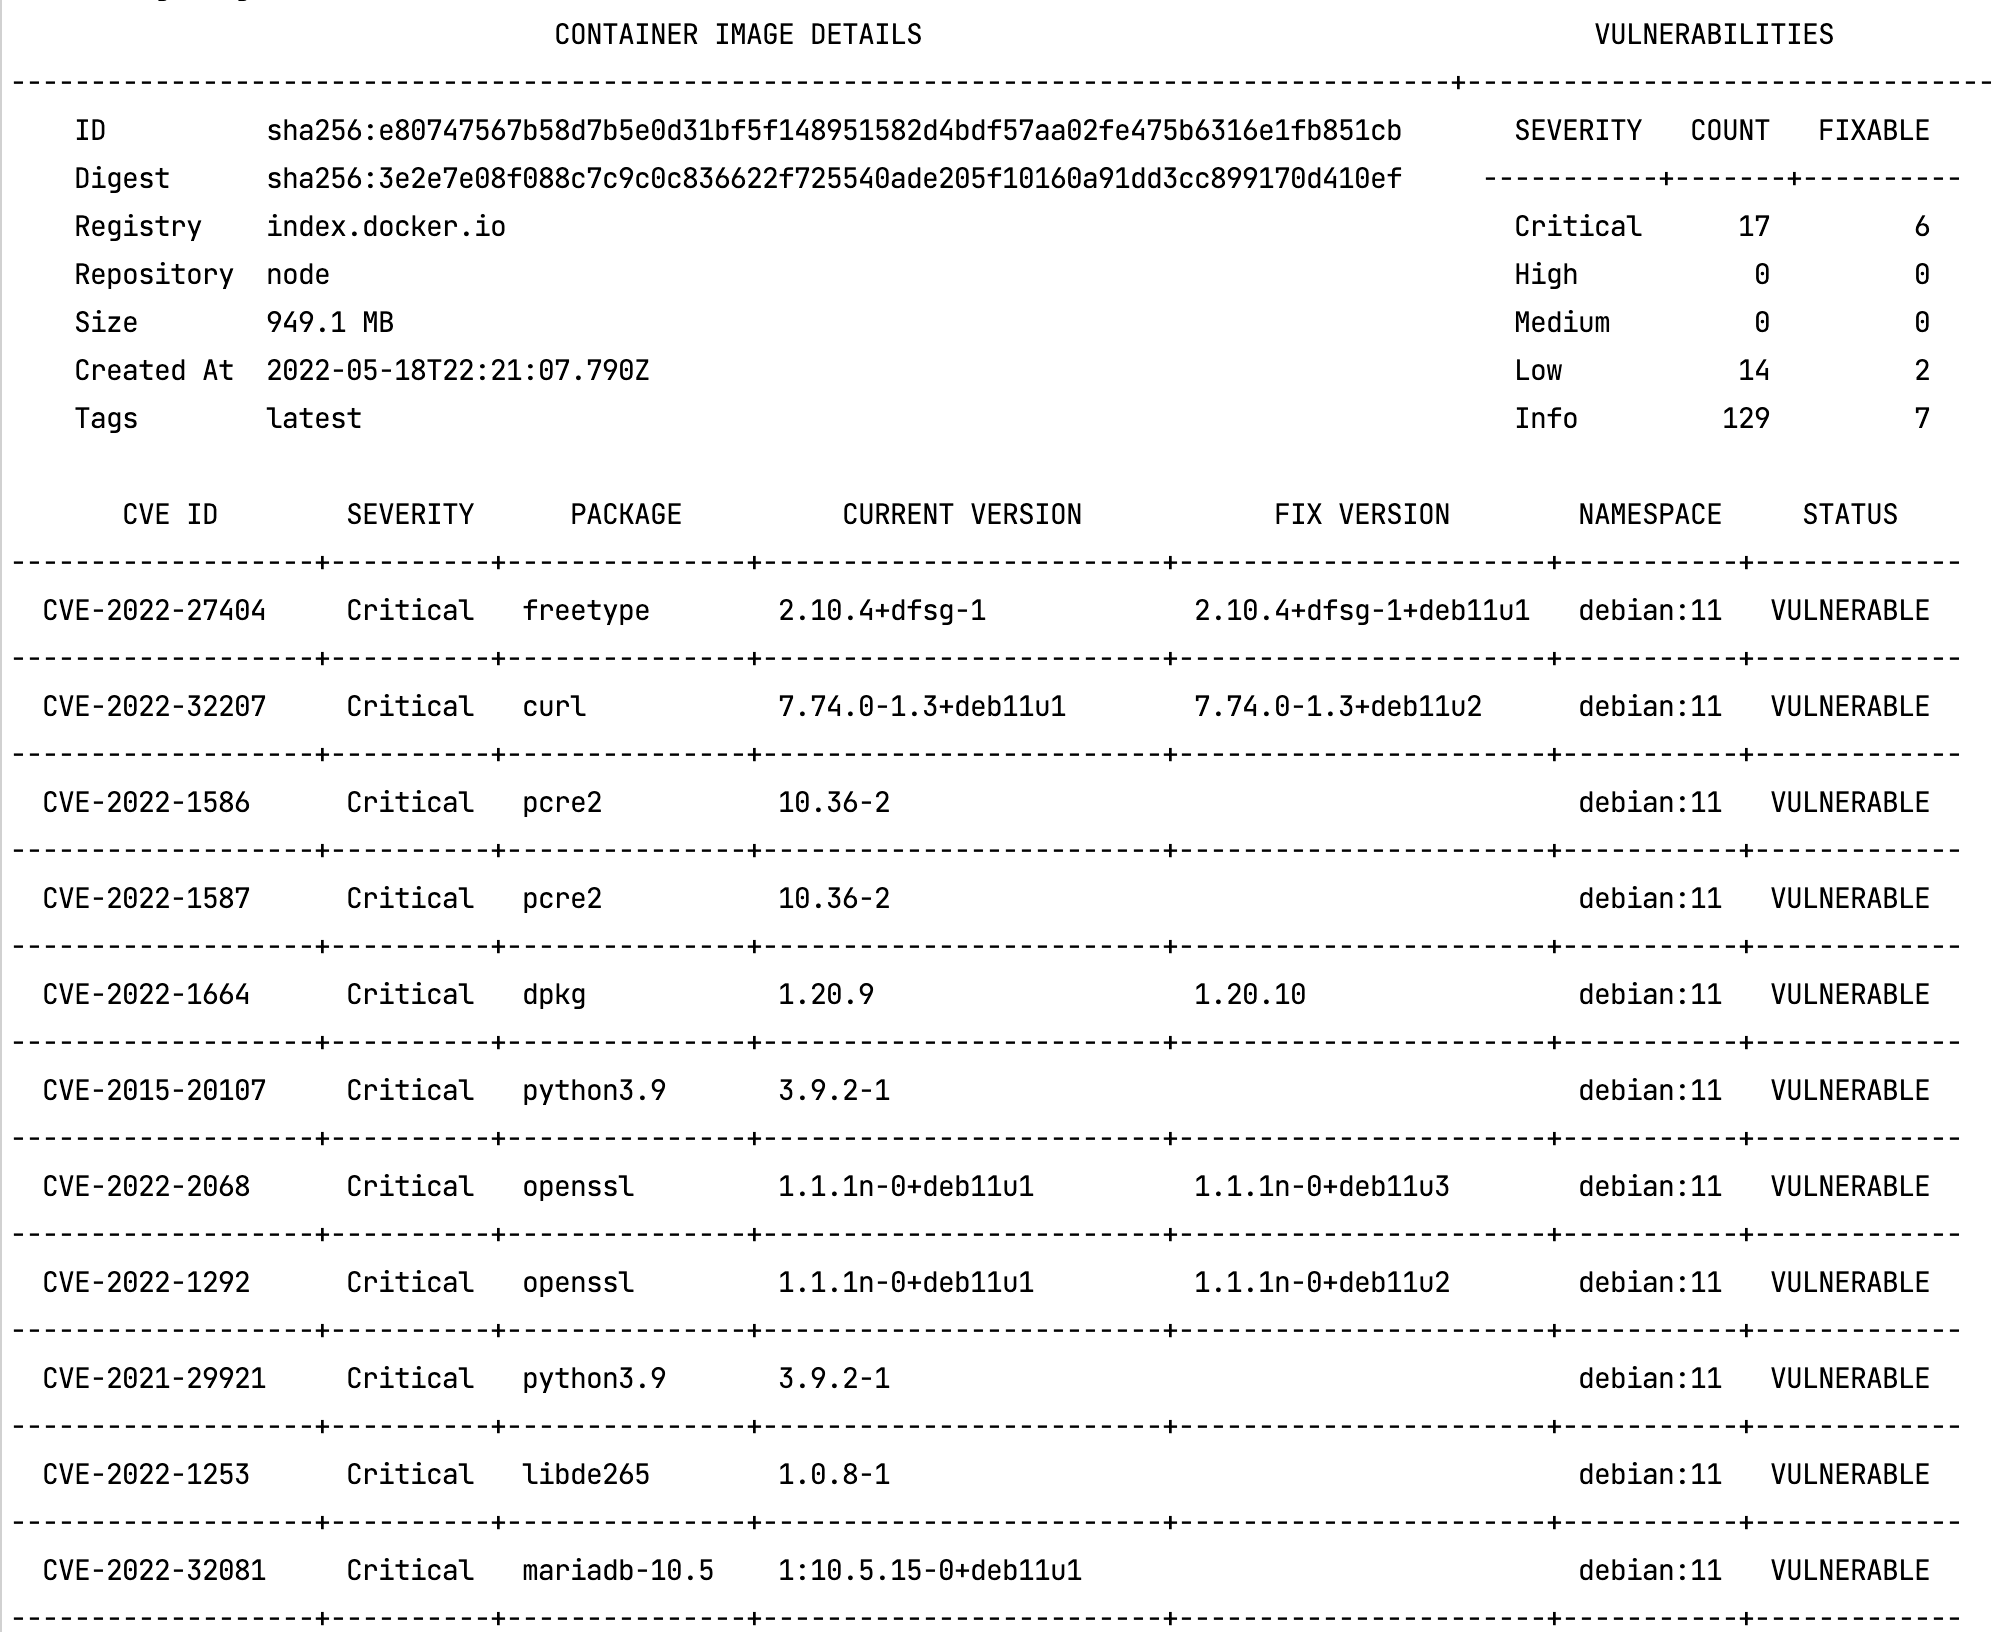
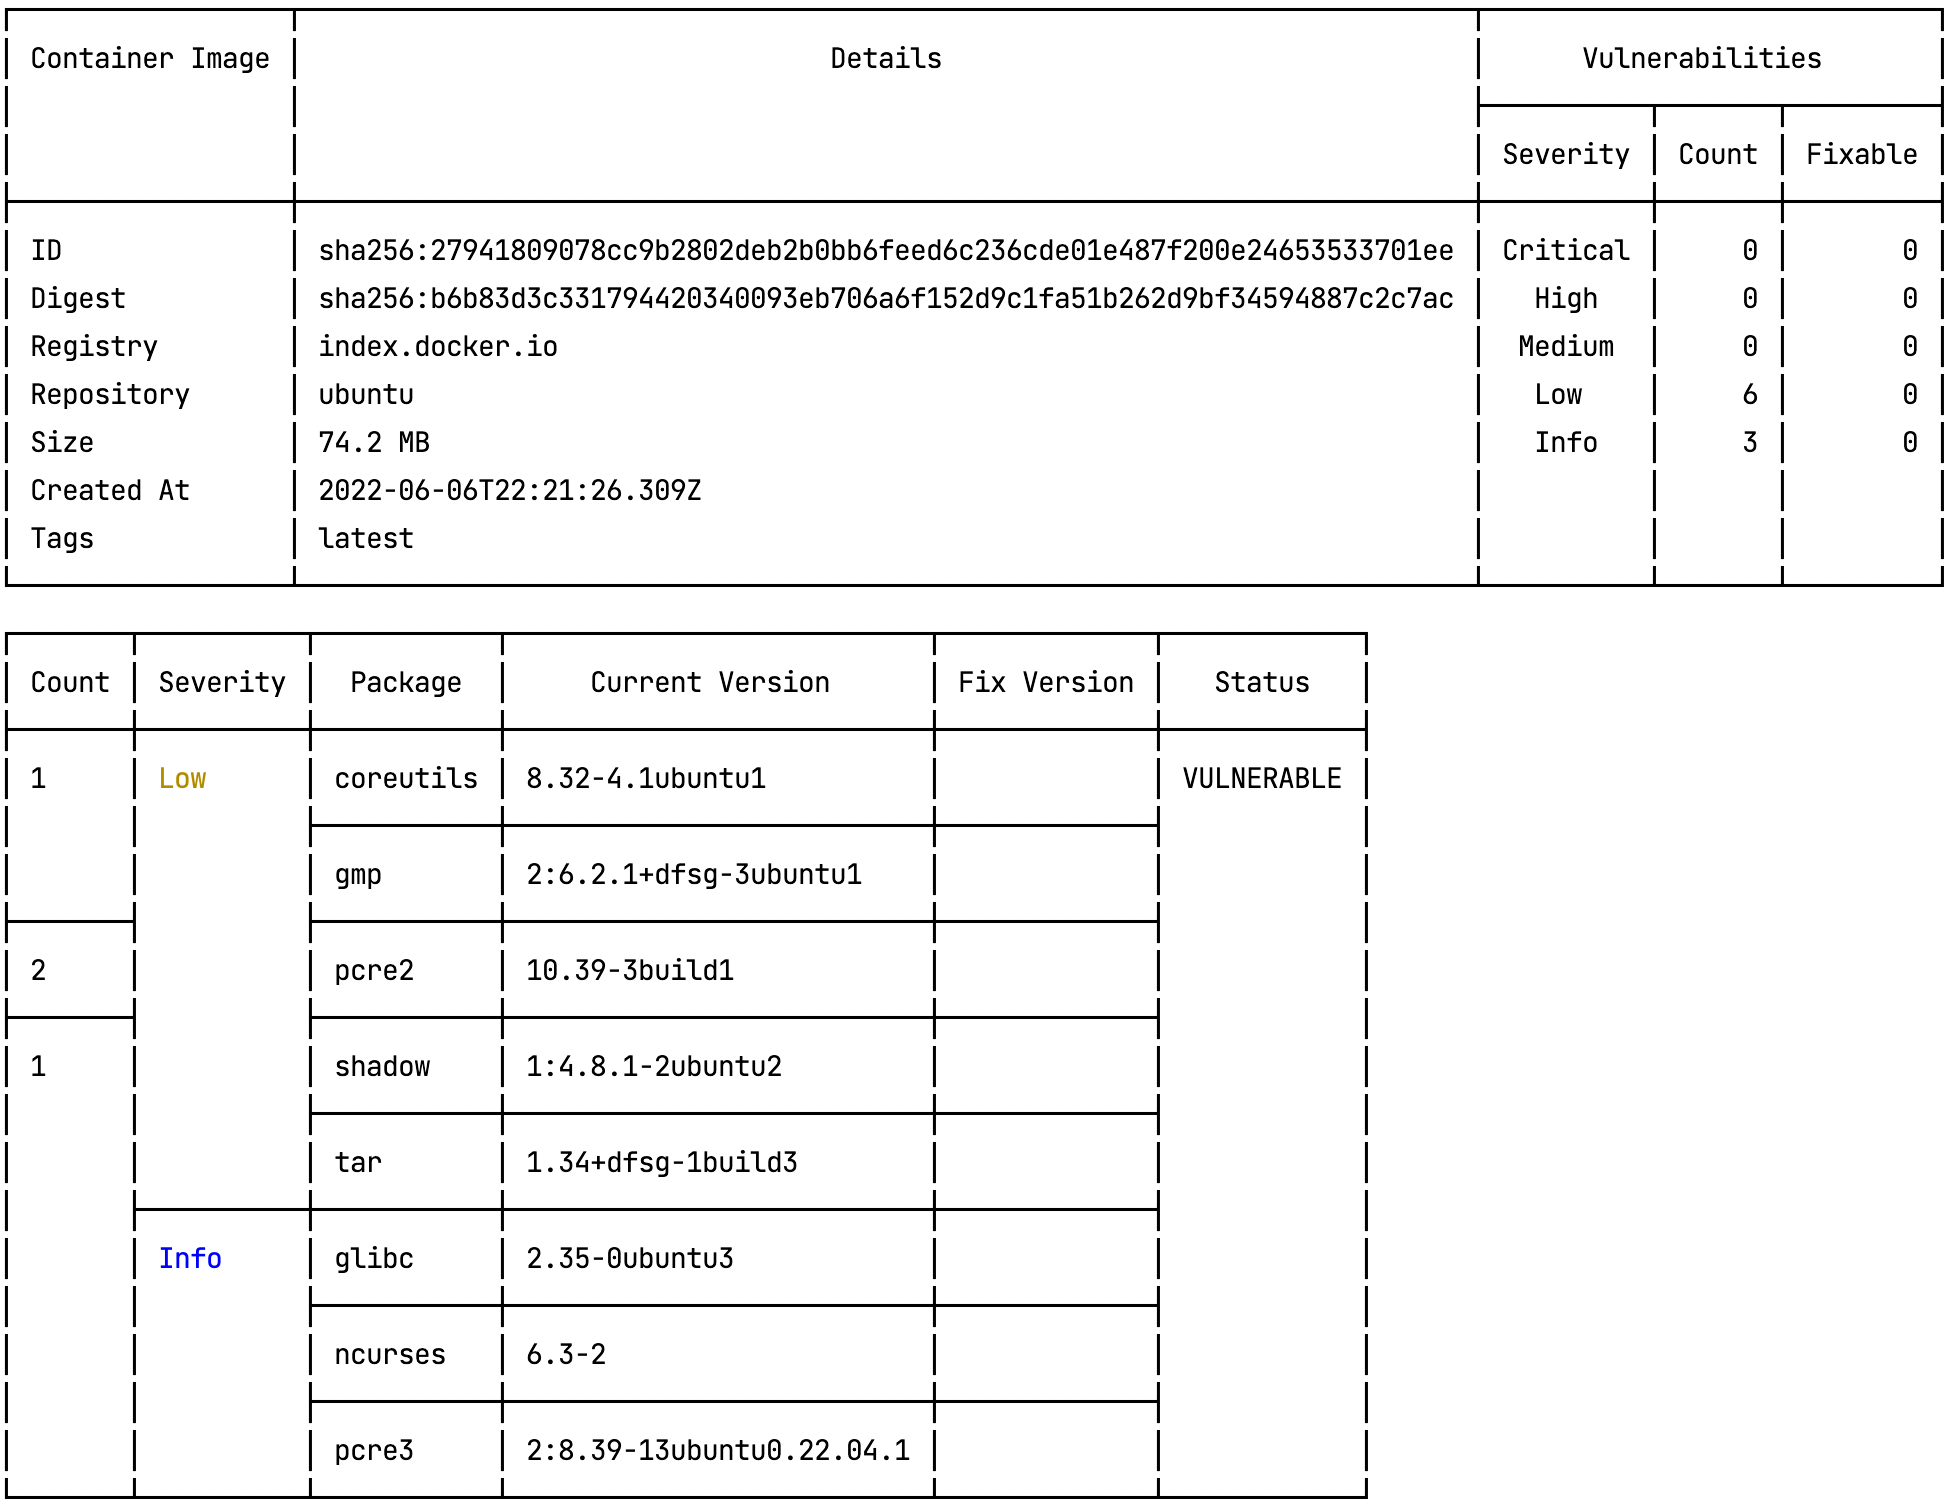
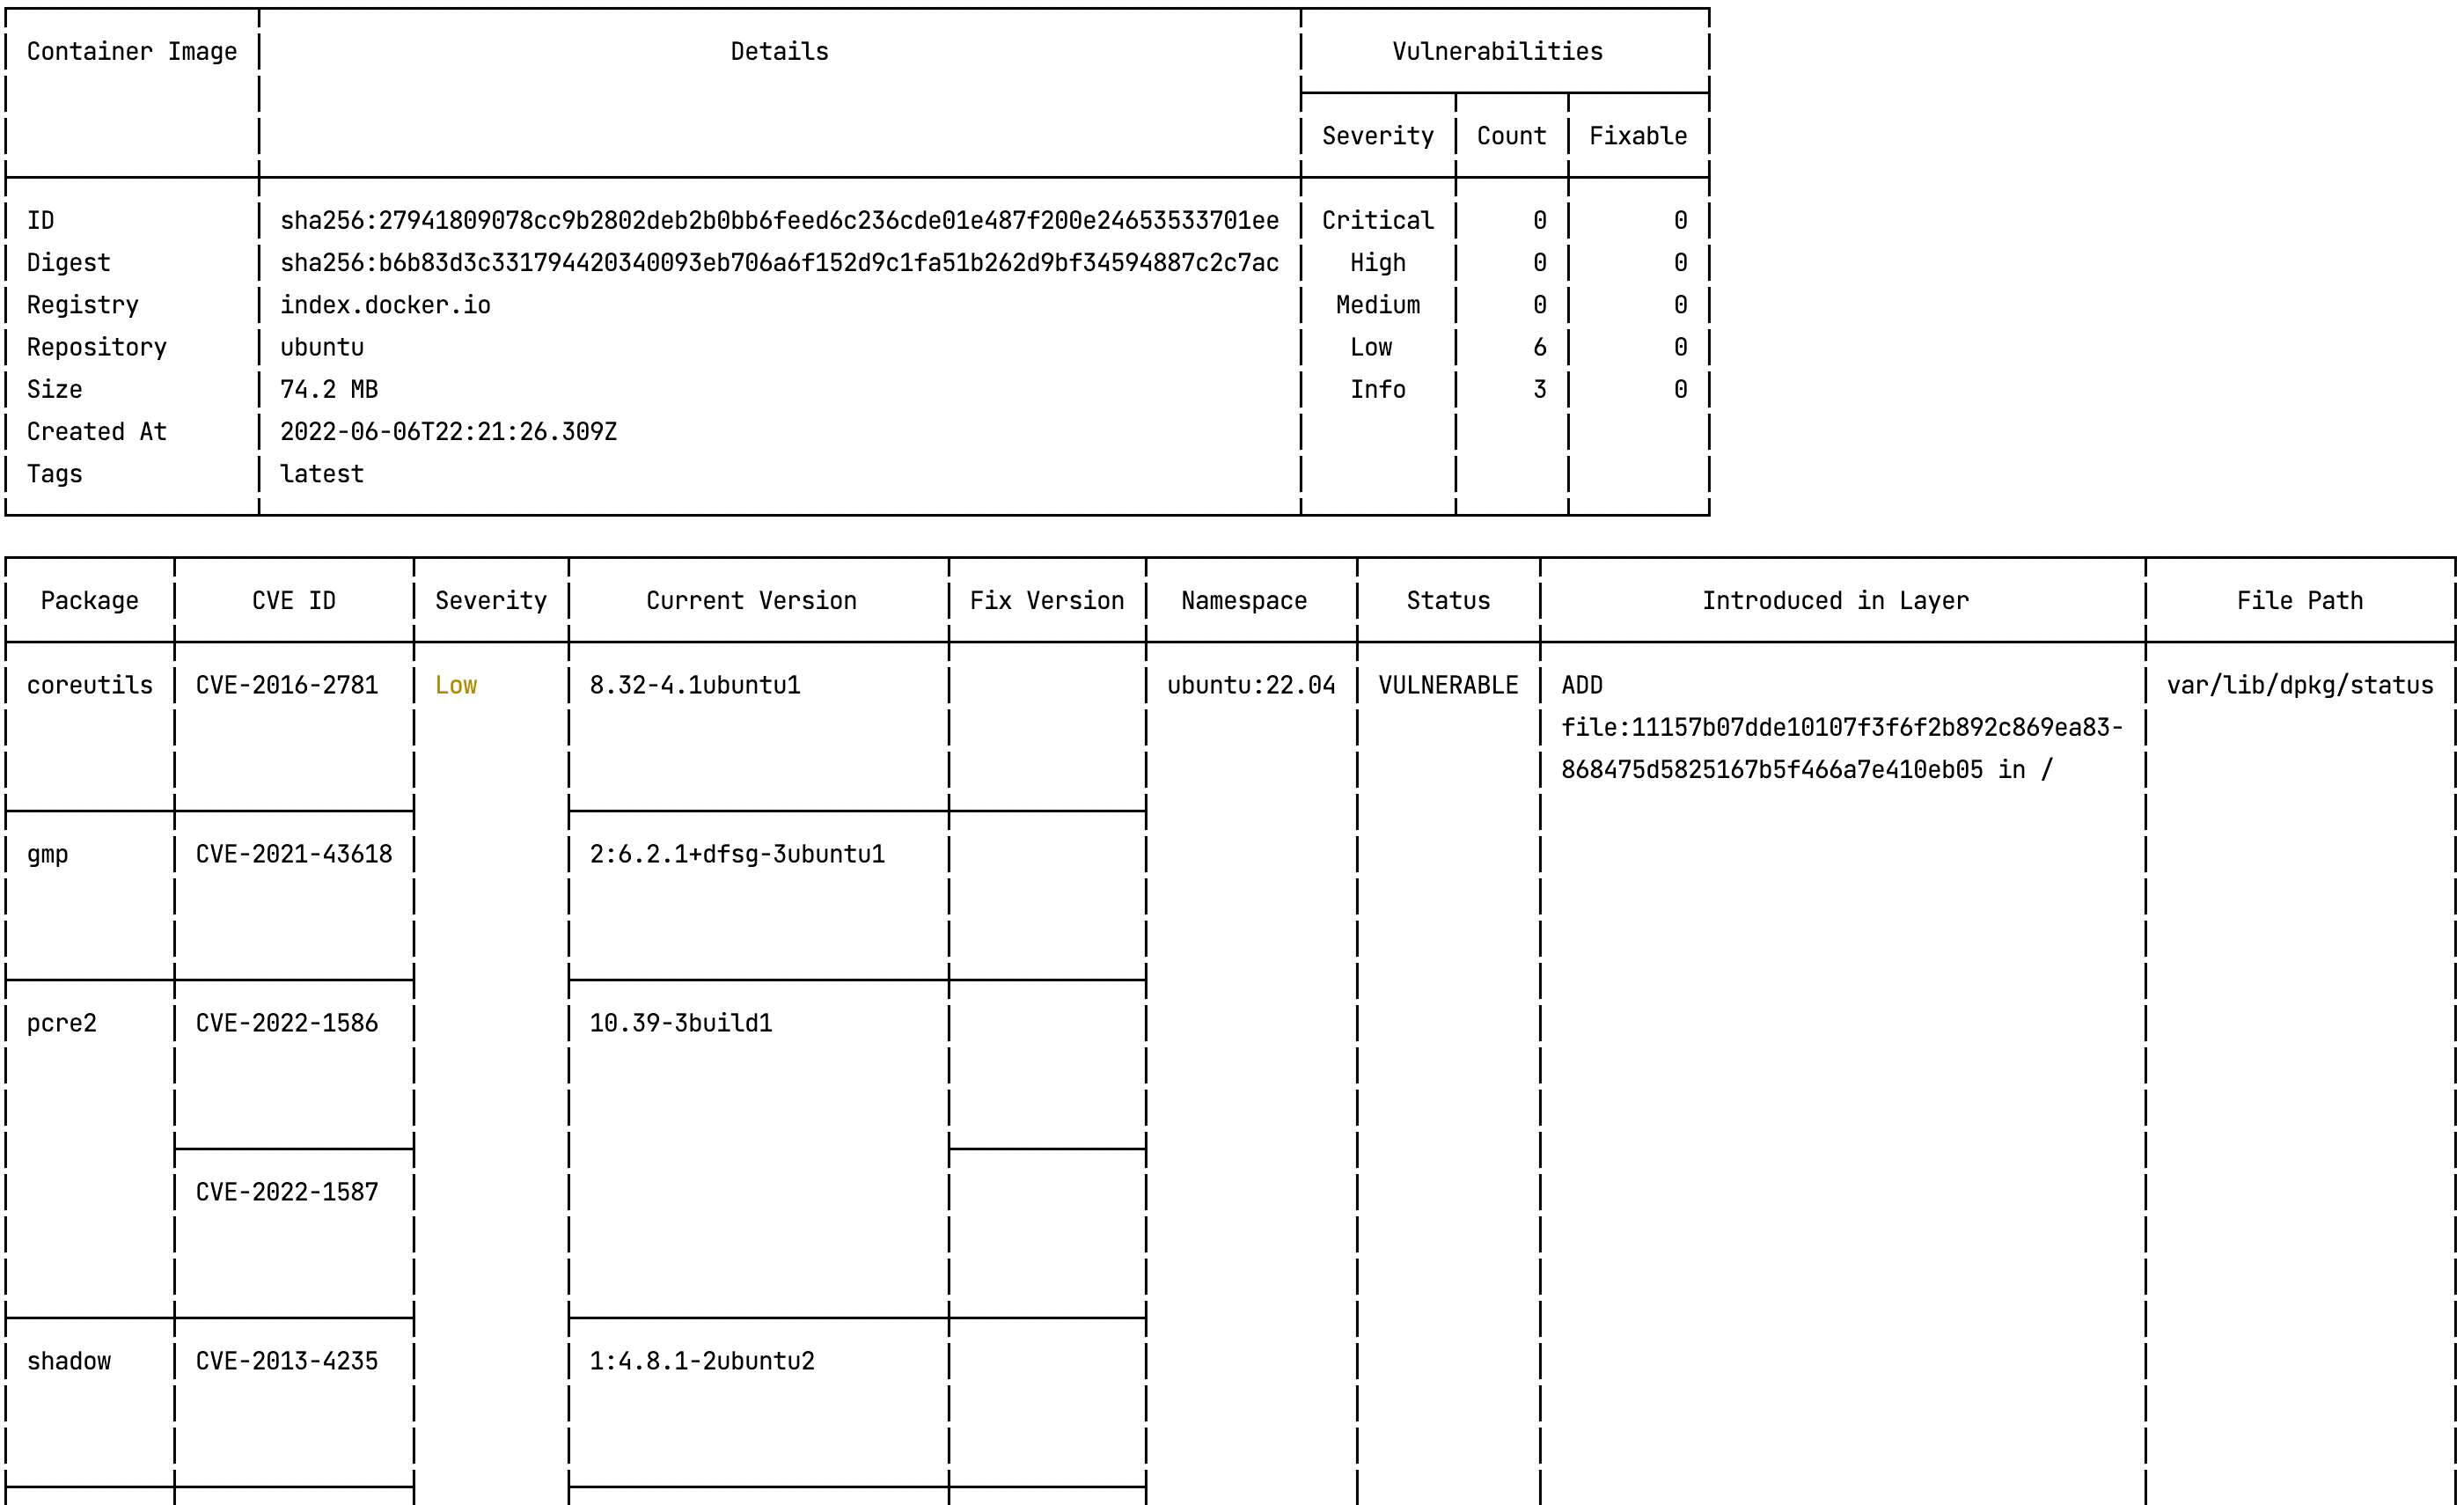
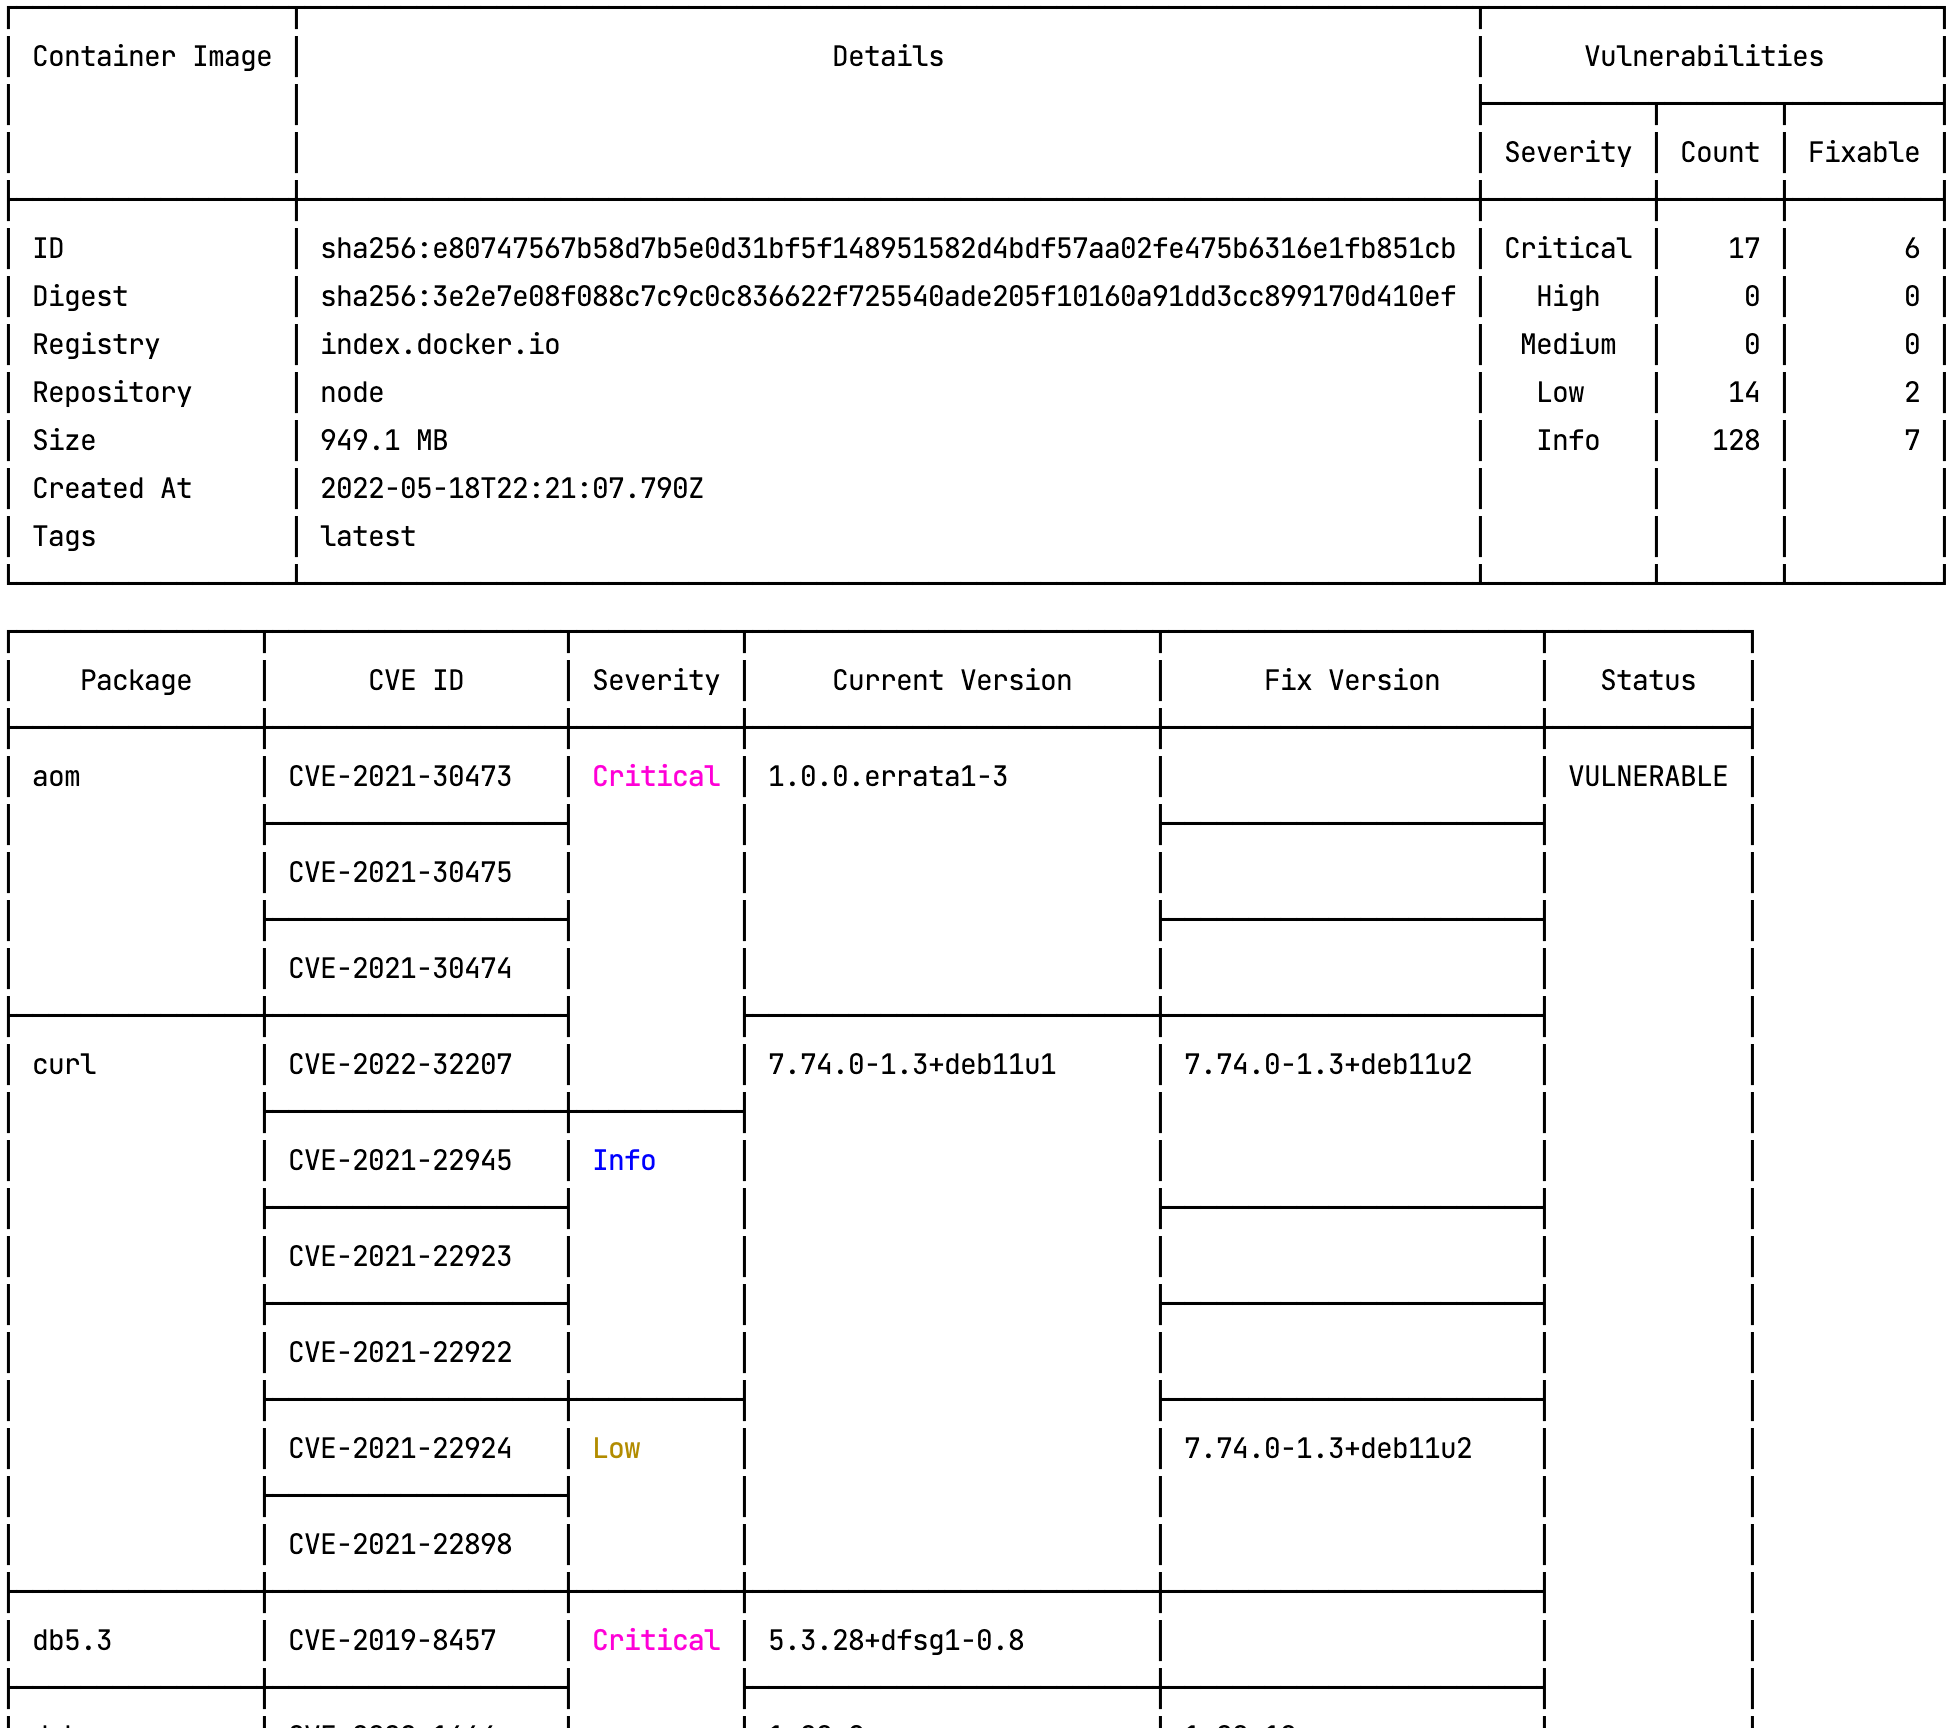
Example Outputs for Evaluation Results
The following examples are evaluation results printed to the command line when using certain flags.
Verbose Mode
-v=true or -j=false
                                  CONTAINER IMAGE DETAILS                                          VULNERABILITIES
------------------------------------------------------------------------------------------+---------------------------------
    ID          sha256:a123b45678901234fake56bc777e3f99faca8aa2bb8c77cadd8888bbbb666f77       SEVERITY   COUNT   FIXABLE
    Digest      sha256:12300e6d3fake30e12345678e901a22a3bb00a77b2d8e66aac2ffe90c1c33333     -----------+-------+----------
    Registry    inline_scanner                                                                Critical       0         0
    Repository  mysql                                                                         High           1         0
    Size        520.0 MB                                                                      Medium         8         0
    Created At  2020-12-21T20:34:37.951Z                                                      Low           13         0
    Tags        latest                                                                        Info          46         0
      CVE ID       SEVERITY   PACKAGE   CURRENT VERSION      FIX VERSION                               INTRODUCED IN LAYER
-----------------+----------+---------+-----------------+-------------------+------------------------------------------------------------------------
  CVE-2020-29361   Medium     p11-kit   0.23.15-2         0.23.15-2+deb10u1   ADD
                                                                              file:3abcef4d123fakec4567fd70a035c130a91b5da001dd99c01b1acd345c0066e9
                                                                              in /
-----------------+----------+---------+-----------------+-------------------+------------------------------------------------------------------------
  CVE-2020-29362   Medium     p11-kit   0.23.15-2         0.23.15-2+deb10u1   ADD
                                                                              file:3abcef4d123fakec4567fd70a035c130a91b5da001dd99c01b1acd345c0066e9
                                                                              in /
-----------------+----------+---------+-----------------+-------------------+------------------------------------------------------------------------
  CVE-2020-29363   Info       p11-kit   0.23.15-2         0.23.15-2+deb10u1   ADD
                                                                              file:3abcef4d123fakec4567fd70a035c130a91b5da001dd99c01b1acd345c0066e9
                                                                              in /
-----------------+----------+---------+-----------------+-------------------+------------------------------------------------------------------------
-v=false or -j=true
{
  "image": {
    "image_info": {
      "created_time": "string",
      "image_digest": "string",
      "image_id": "string",
      "registry": "string",
      "repository": "string",
      "size": 0,
      "tags": [
        "string"
      ]
    },
    "image_layers": [
      {
        "hash": "string",
        "created_by": "string",
        "packages": [
          {
            "name": "string",
            "namespace": "string",
            "fix_available": "string",
            "version": "string",
            "vulnerabilities": [
              {
                "name": "string",
                "description": "string",
                "link": "string",
                "severity": "string",
                "metadata": {
                  "additionalProp1": {},
                  "additionalProp2": {},
                  "additionalProp3": {}
                },
                "fix_version": "string"
              }
            ],
            "fixed_version": "string",
            "host_count": "string",
            "severity": "string",
            "cve_link": "string",
            "cvss_score": "string",
            "cvss_v3_score": "string",
            "cvss_v2_score": "string",
            "status": "New",
            "package_status": "string",
            "last_updated_time": "string",
            "first_seen_time": "string"
          }
        ]
      }
    ]
  },
  "scan_status": "string",
  "total_vulnerabilities": 0,
  "critical_vulnerabilities": 0,
  "high_vulnerabilities": 0,
  "medium_vulnerabilities": 0,
  "low_vulnerabilities": 0,
  "info_vulnerabilities": 0,
  "fixable_vulnerabilities": 0,
  "last_evaluation_time": "string"
}
--wide=false --simple
-w=false --pretty
--pretty
--exceptions

--pretty --simple
--pretty --simple --no-color
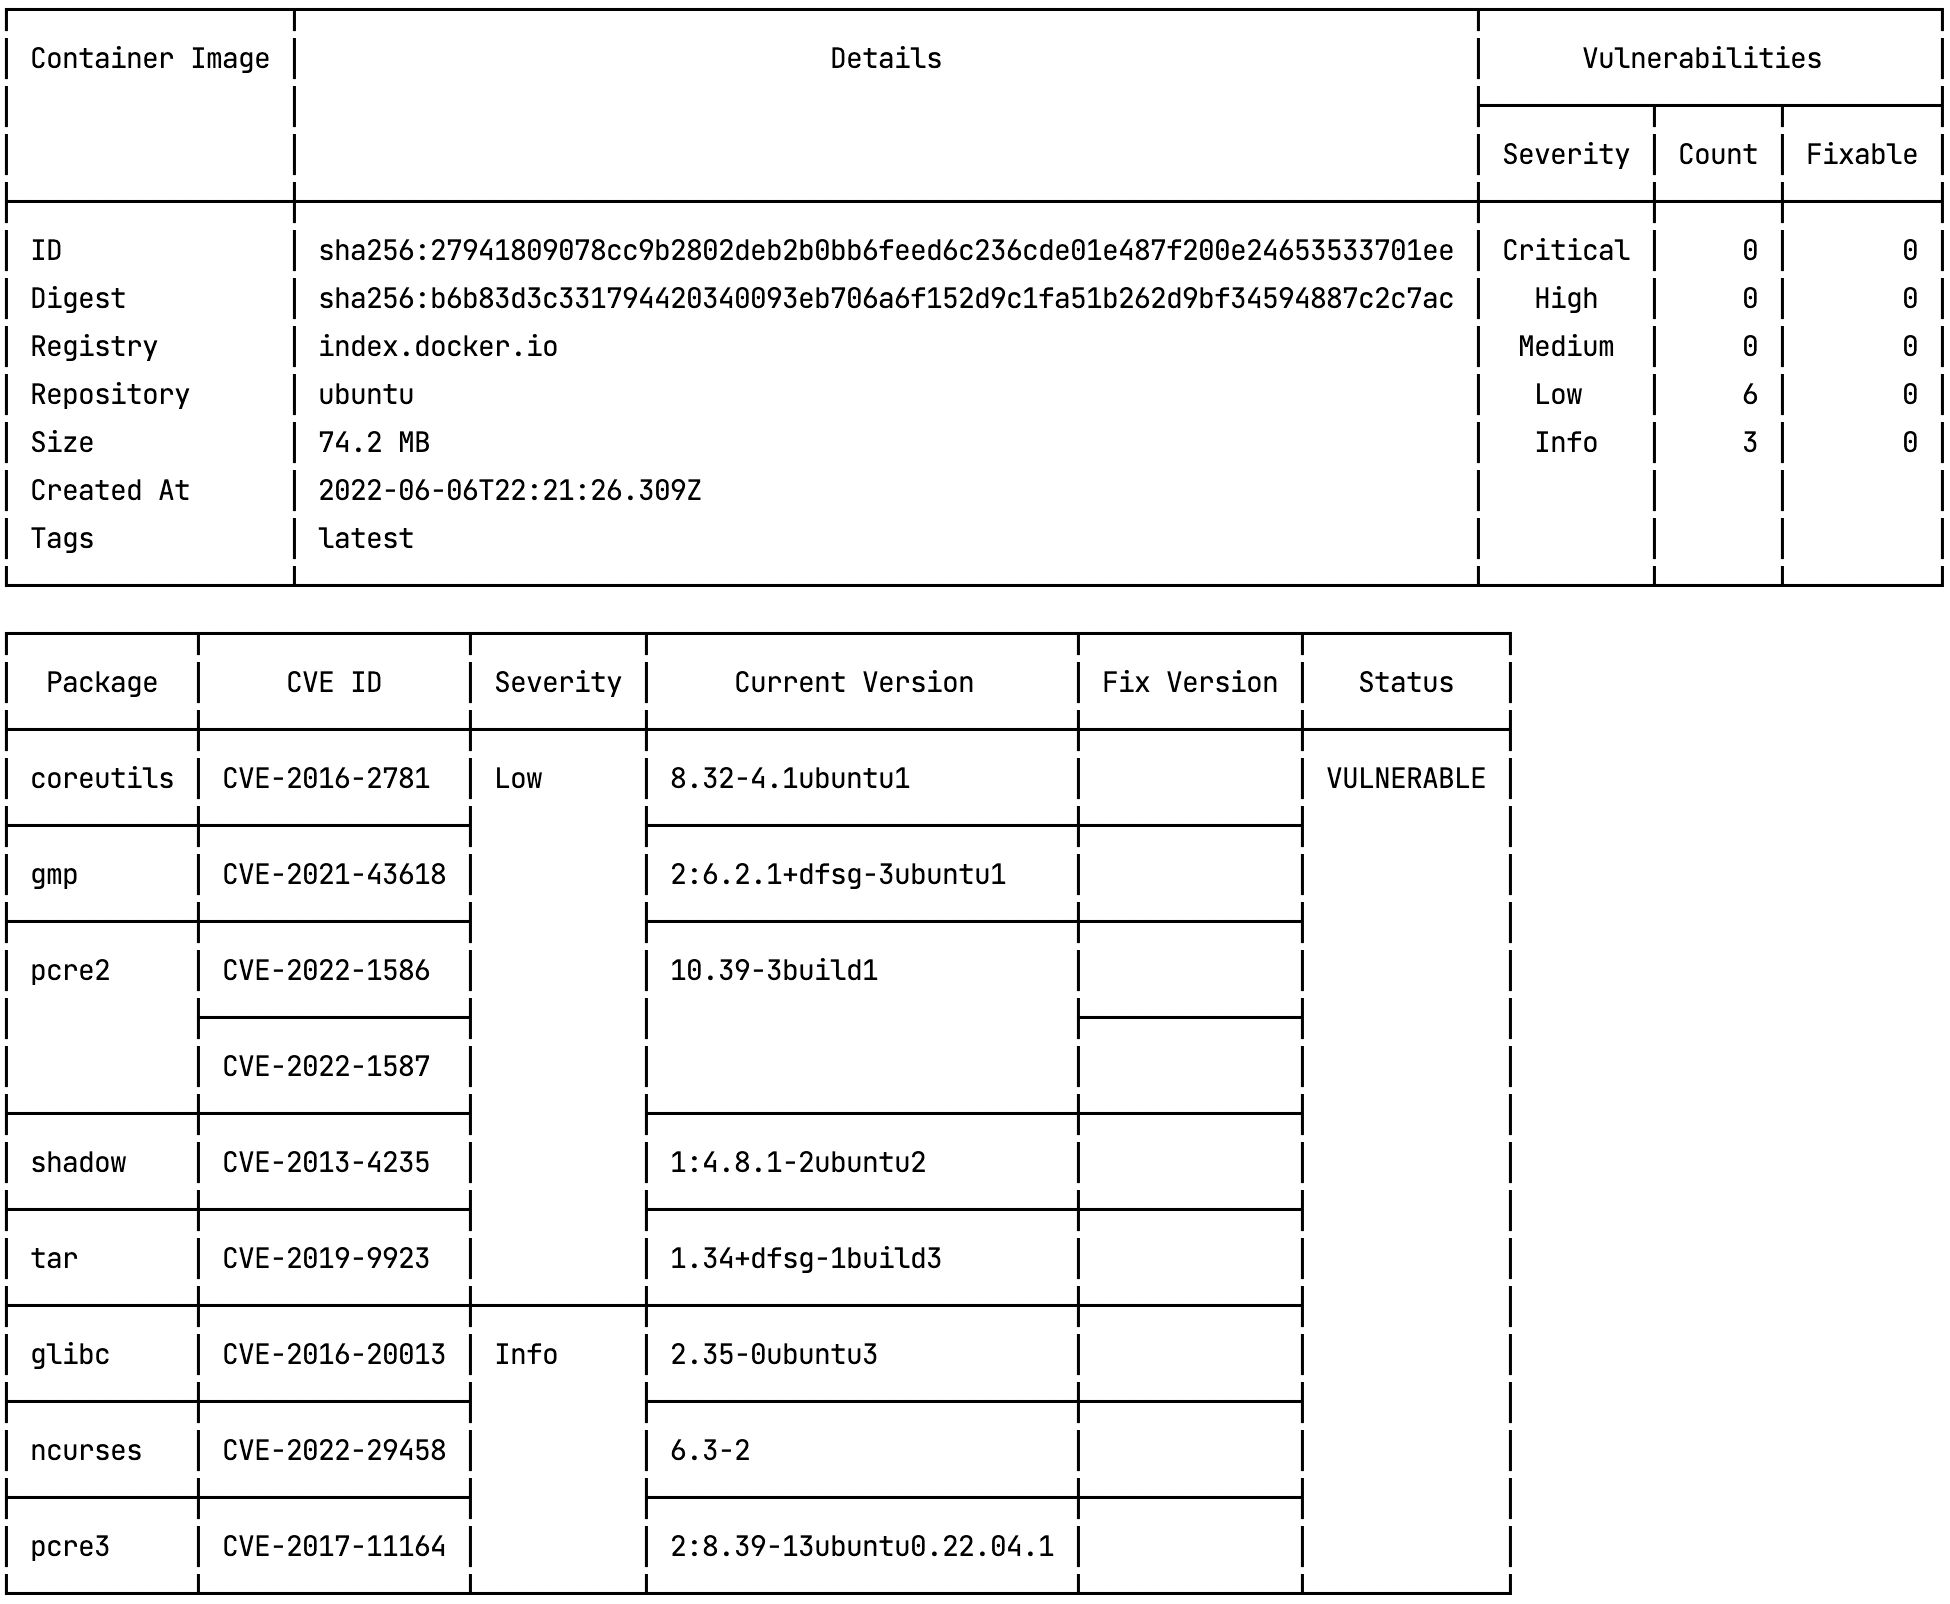
HTML Report
When using the --html flag, a HTML report will be generated. This report is very similar to the one in the Lacework Console with the following differences:
- The colored line chart in the Lacework Console displays Unique vulnerabilities found.
- The colored line chart in the HTML report displays All vulnerabilities found.
Unique = The number of unique vulnerabilities (CVEs) found in the operating system and non-os packages. Different packages can contain the same vulnerabilities and this figure will not include duplicate CVEs.
All = The total number of CVEs found in the operating system and non-os packages. This report will count all vulnerabilities regardless if they are found in multiple packages.
note
At the bottom of the report in the Lacework Console, the X rows found field will match the All vulnerabilities count.
Inline Scanner Results vs Lacework Console Results
There is a difference between the results shown in the Console (when --save or export LW_SCANNER_SAVE_RESULTS=true is used) versus the results shown in the Inline Scanner output.
This difference occurs when a single vulnerability (CVE) affects more than one package:
- The Lacework Console reports the number of distinct vulnerabilities (CVEs) per severity level.
- The Inline Scanner reports multiple vulnerabilities if the same vulnerability (CVE) affects multiple different packages.
image scan
The image scan command only collects package information from the container image and saves the data to a manifest; Lacework does not assess the data. This allows the collected data to be examined so you can verify what data would be sent to Lacework if assessment were to occur.
To perform an image scan, run one of the following commands:
lw-scanner image scan image_name image_tag [flags]
lw-scanner image scan image_name:image_tag [flags]
Flags for image scan
--no-pullwill stop the image from being pulled if not present locally.--scan-library-packageswill scan the image for non-OS library packages. To find out more about this feature, see the Language Libraries Support section.- Alternatively, use
export LW_SCANNER_DISABLE_LIBRARY_PACKAGES_SCANNING=falseto set an enviroment variable on your local or CI/CD system.
- Alternatively, use
-v, --verbosesets verbose mode. True (default) prints detailed process data in the command line. False does not print any process data in the command line.
Tag Commands
This section provides information about the available tag commands. These commands allow you to add, remove, or view the environment tags associated with the inline scanner.
tags add
The tags add command adds a new tag to the inline scanner. To add a tag, run this command:
lw-scanner tags add
Provide the following information for the tag you want to add:
- Key
- Value
tags remove
The tags remove command removes a tag from the inline scanner. To remove a tag, run this command:
lw-scanner tags remove
Provide the key for the tag you want to remove.
tags view
The tags view command displays currently configured inline scanner tags. To view tags, run this command:
lw-scanner tags view
Example tags output:
{
    "build_id": "dev_build",
    "build_plan": "dev_machine",
    "hostname": "My-MacBook-Pro.local",
    "source": "lacework_inline_scanner",
    "user": "Firstname Lastname"
}
You can set the build_id and build_plan with the image evaluate command’s -i and -p flags, respectively. The hostname and user are based on the local host and user information where the inline scanner is located. The source is hard-coded to lacework_inline_scanner.
version
The version command displays the inline scanner and data format versions. To display versions, run this command:
lw-scanner version
Lacework Scanner Upgrades
When running any lw-scanner command, a prompt will display at the end of the output if there is a new version of the Lacework Scanner available.
Example for Mac OS:
A newer version of the Lacework Vulnerability Scanner is available! The latest version is v0.1.3,
to update execute the following command:
curl -OL https://github.com/lacework/lacework-vulnerability-scanner/releases/latest/download/lw-scanner-darwin-amd64 | bash
To disable this prompt, see the configure version command.
daemon run
The daemon run command starts the inline scanner as a background process on your host. Use this option to imitate the proxy scanner as a locally run process. The scan results will only be shown in the Lacework Console using this method.
Ensure that you use the authorization token from a proxy scanner instance when you run the inline scanner in daemon mode. Do not use an inline scanner token as this results in a 403 error.
To start the daemon service, run this command:
lw-scanner daemon run [flags]
Flags for daemon run
--config stringdefines the path to the lw-scanner configuration yaml. The scanner can be configured for auto polling, registry notification, or on-demand scans. See the Configure the Proxy Scanner section for help on configuring these types with examples of each one.--help, -hprovides a brief explanation of these flags.--port integersets the port that the daemon service will use to listen for requests (default:8080).
Example usage:
lw-scanner daemon run --config configs/config.yml --port 8080
Container Vulnerability Policy Support
When running the image evaluate command, an additional flag can be used (--policy) to trigger image evaluations based on enabled container vulnerability policies in the Lacework Console.
lw-scanner image evaluate myImage myImageTag --save --policy
This command scans your image to check what containers are in breach of your vulnerability policies and saves the results to the Lacework Console.
Exit Codes for Policy Violations
Use the following exit codes to prevent container images from being deployed due to a policy violation:
| Flag | Value Type | Description |
|---|---|---|
--fail-on-violation-exit-code | Integer (default = -1) | Exit code for a policy violation when Action on failure is set to Block. Used for Kubernetes Admission Controller integrations. |
--critical-violation-exit-code | Integer (default = -1) | Exit code for critical severity policy violation |
--high-violation-exit-code | Integer (default = -1) | Exit code for high severity policy violation |
--medium-violation-exit-code | Integer (default = -1) | Exit code for medium severity policy violation |
--low-violation-exit-code | Integer (default = -1) | Exit code for low severity policy violation |
--info-violation-exit-code | Integer (default = -1) | Exit code for info severity policy violation |
The default value of -1 causes no action to occur. Use one or more of these flags with an integer of 0 or above to publish this exit code when a policy failure occurs.
Use Case for Exit Codes
Provide the value for each exit code and give each code a different integer value.
--fail-on-violation-exit-code 1
--critical-violation-exit-code 2
--high-violation-exit-code 3
--medium-violation-exit-code 4
--low-violation-exit-code 5
--info-violation-exit-code 6
If a violation occurs for a critical policy during the image evaluation, the integer value 2 is published by the scanner output.
Exit Code Priority
If more than one violation occurs for policies that have different severity levels, the highest severity exit code is published by the scanner output.
The following list demonstrates the order of priority for the severity levels with 1 being the highest:
- Fail
- Critical
- High
- Medium
- Low
- Info
Following the example shown in Use case for exit codes, if both a critical and medium policy violation occurred, the integer value 2 is published as it is a higher priority violation.