AWS Integration Prerequisites
This topic explains how to prepare for Lacework integration from the AWS console.
If you plan to use Terraform, see Integrate Lacework with AWS.
If you plan to use CloudFormation, see AWS Integration Using CloudFormation.
Prerequisites
Before you can integrate your AWS cloud environment with Lacework, you must configure the following for compliance and CloudTrail monitoring with Lacework:
- SNS topic - Amazon Simple Notification Service (SNS) topic is a logical access point that acts as a communication channel. A topic lets you group multiple endpoints (such as AWS , Amazon SQS, HTTP/S, or an email address). An SNS topic is required for all CloudTrail integrations. Lacework can use an existing SNS topic or create one if you have not added an SNS topic to an existing CloudTrail.
- SQS queue - Amazon Simple Queue Service (SQS) is a message queue service used by distributed applications to exchange messages through a polling model, and can be used to decouple sending and receiving components—without requiring each component to be concurrently available. Using Amazon SNS and Amazon SQS together, messages can be delivered to applications that require immediate notification of an event, and also persisted in an Amazon SQS queue for other applications to process at a later time. An SQS queue is required for all AWS CloudTrail integrations monitored by Lacework.
- S3 bucket - A bucket is a container for objects stored in Amazon S3. An S3 bucket is required for all CloudTrail integrations. Lacework can use an existing bucket or create a new bucket in the designated account.
- CloudTrail - AWS CloudTrail is an AWS service that helps you enable governance, compliance, and operational and risk auditing of your AWS account. Actions taken by a user, role, or an AWS service are recorded as events in CloudTrail. Lacework can create a new trail or use an existing CloudTrail.
- IAM cross-account role - A cross-account role is required to give Lacework access for assessments of cloud resource configurations and for analysis of CloudTrail events. The cross-account role is given the following policies:
- SecurityAudit - AWS Managed Policy to provide read-only access to cloud resource configurations.
- Lacework custom audit policy - A custom policy that extends SecurityAudit to enable read-only access to additional configuration resources.
- Lacework custom IAM policy - A custom policy that provides Lacework read-only access to ingest CloudTrail logs.
note
Ensure that your IAM cross-account role and S3 bucket are collocated in the same AWS account - whether you're trying to configure this manually, via CloudFormation, or Terraform. This is related to legacy AWS rules that govern access to objects created inside S3 buckets that are beyond Lacework’s control. Setting up cross-account access is not enough to work around this issue.
Additional requirements:
- AWS Account Admin - The account used must have administrative privileges for every AWS account that you want to integrate with Lacework.
- Lacework Administrator - You must have a Lacework account with administrator privileges.
Overview
Lacework supports three pipelines to integrate with AWS:
The pipeline design depends on your current environment and your future design goals.
- As long as the data arrives at Lacework, your pipeline design choices are up to you.
- For example, if your SNS topic is in a separate AWS account, you can use the option of not using SNS.
- Also, if your existing S3 bucket is already sending messages to your existing SQS queue, the new S3 to SQS notification setup (for Lacework) is not possible because both notifications require the same suffix (not allowed by AWS). In this case, you can move to an SNS fanout.
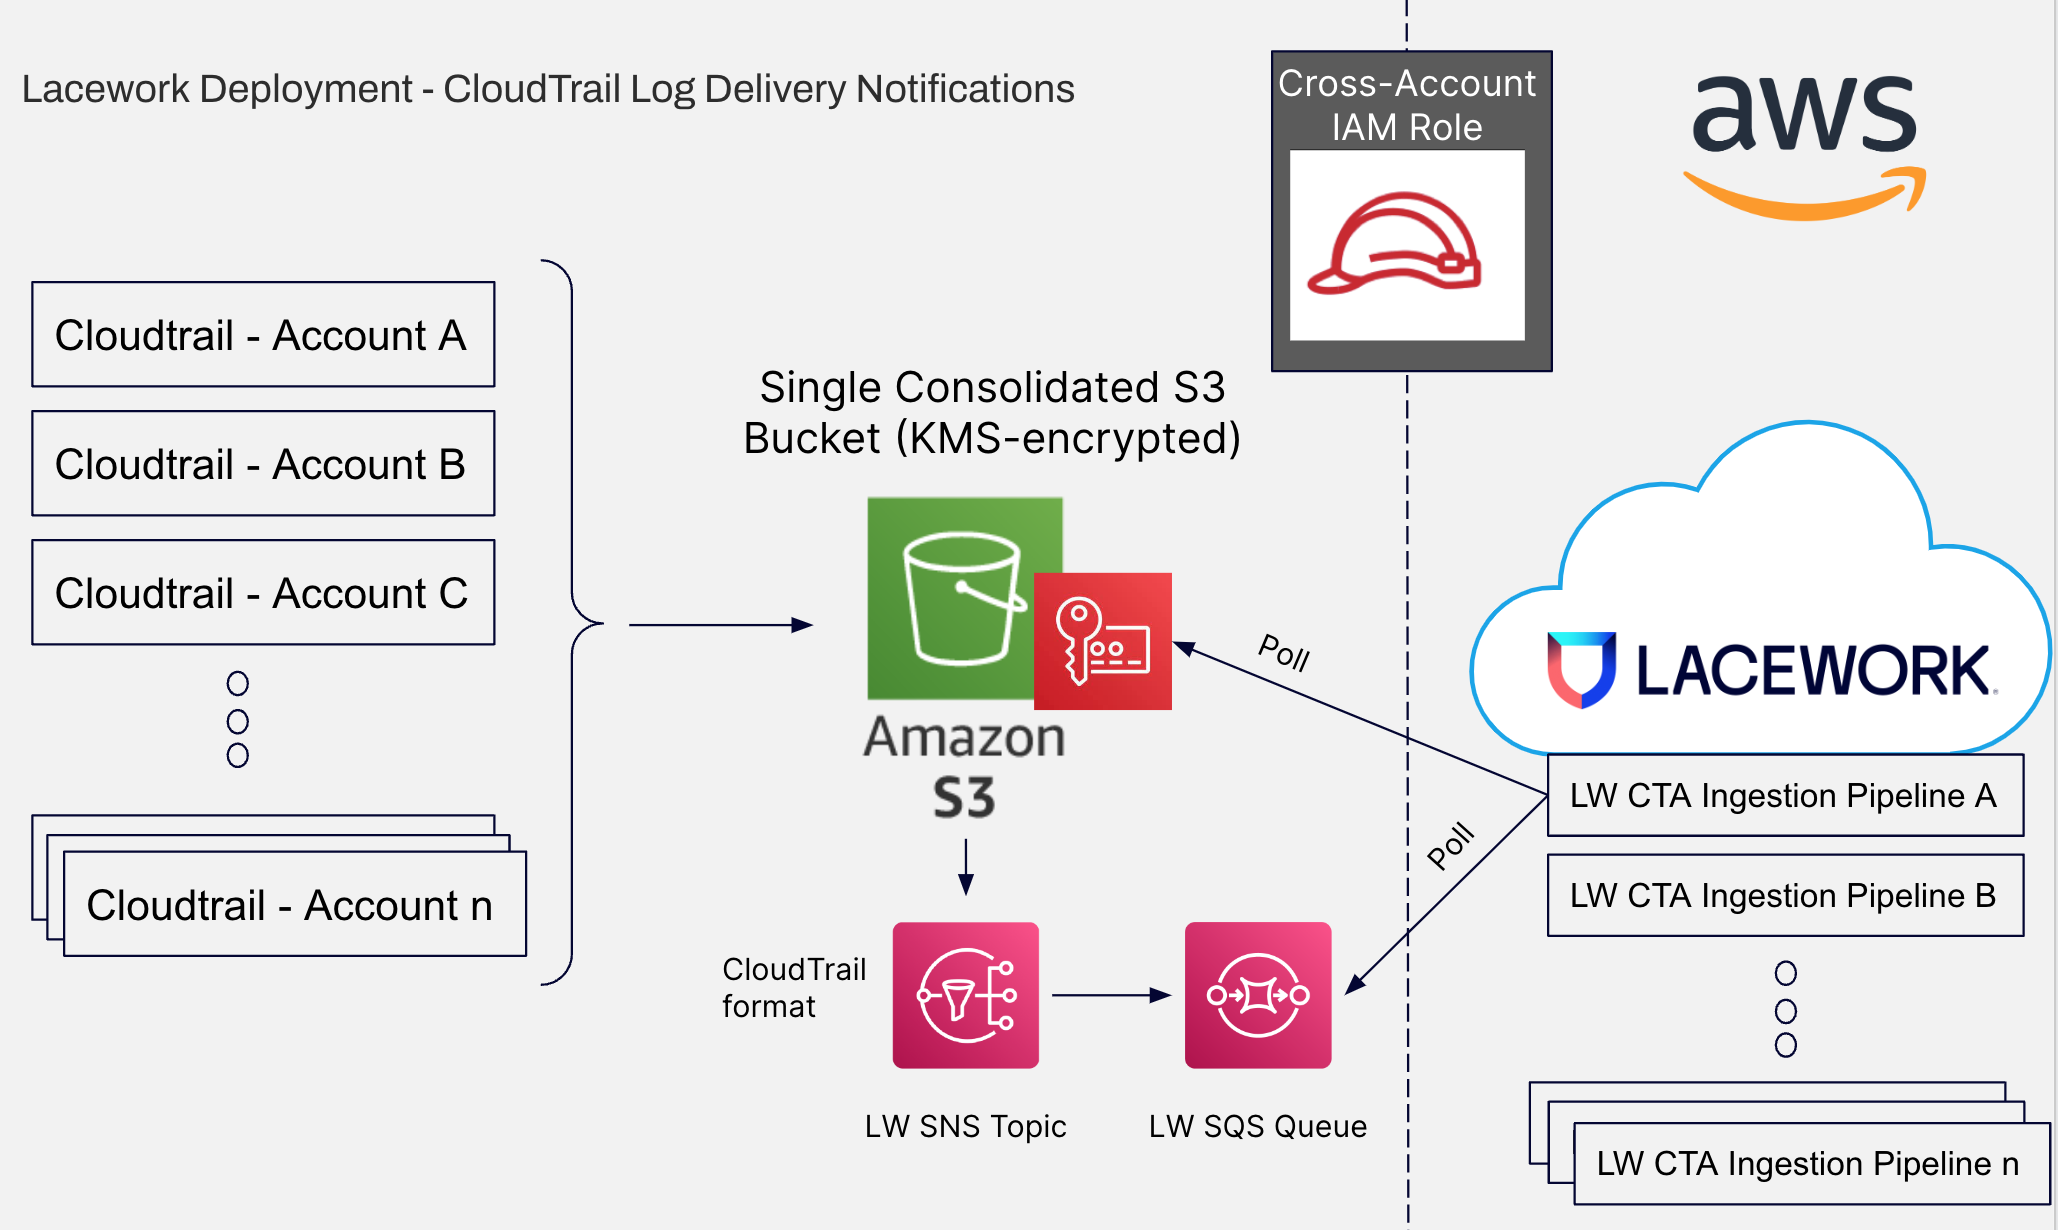
CloudTrail Log Delivery Notifications
The following diagram shows a simple presentation of the AWS integration using CloudTrail SNS notifications.
1. Create an SNS Topic
An SNS topic is a communication channel for SQS queue messaging from your AWS environment to Lacework.
If you already have an SNS topic for integration, copy or record the Amazon Resource Name (ARN) for the topic. If you do not have an SNS topic, use the following steps to create one.
Log in to your AWS account.
Go to the Amazon Simple Notification Service page.
Click Next step to create a new SNS topic.
Select the Standard type of topic.
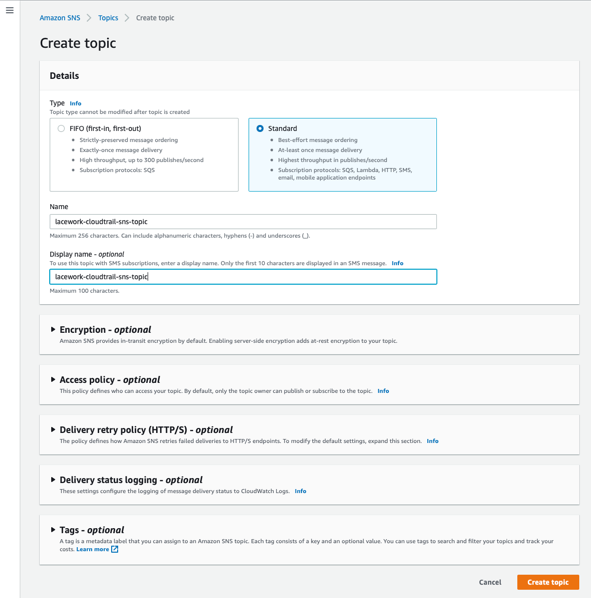
Enter a name and display name for the new topic.
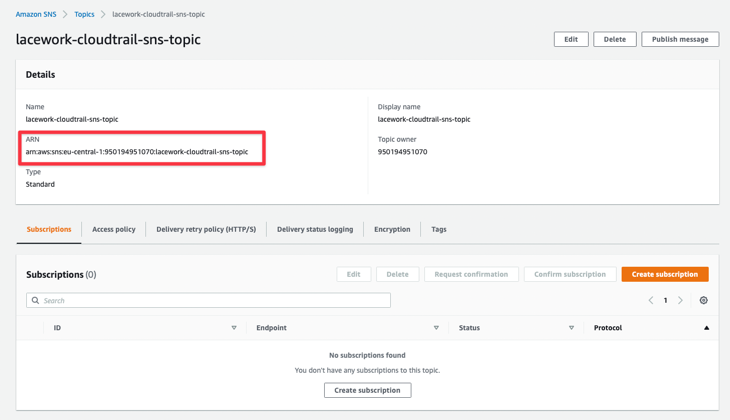
Click Create topic. Details of the new SNS topics appear, along with the ARN for the topic.
Copy or record the ARN for the new topic. You will need this information when you configure integration from the Lacework Console.
2. Configure the Access Policy for your SNS Topic
Select the Access policy tab for your SNS topic.
Click the Edit option.
Copy the following code snippet and replace the existing policy code block (using the ARN you just recorded):
{
     "Version": "2012-10-17",
     "Statement": [
         {
         "Sid": "AWSCloudTrailSNSPolicy20131101",
         "Effect": "Allow",
         "Principal": {
             "Service": "cloudtrail.amazonaws.com"
         },
         "Action": "SNS:Publish",
         "Resource": "<ARN_of_SNS_Topic>"
         }
     ]
}
Click Save.
By default, the topic owner has permissions to publish the topic. To enable other users or applications to publish to the topic, you should use AWS Identity and Access Management (IAM) to give publish permission to the topic. For more information about giving permissions for Amazon SNS actions to IAM users, see Using identity-based policies with Amazon SNS.
3. Set Up CloudTrail SNS Delivery
1. Create an S3 Bucket
S3 buckets store CloudTrail log files and are containers for objects stored in Amazon S3. Ensure that you have an AWS S3 bucket available to store CloudTrail log files.
Log in to your AWS account.
Go to the Amazon S3 page.
Click Create bucket to create a new S3 bucket. The Create bucket page appears.
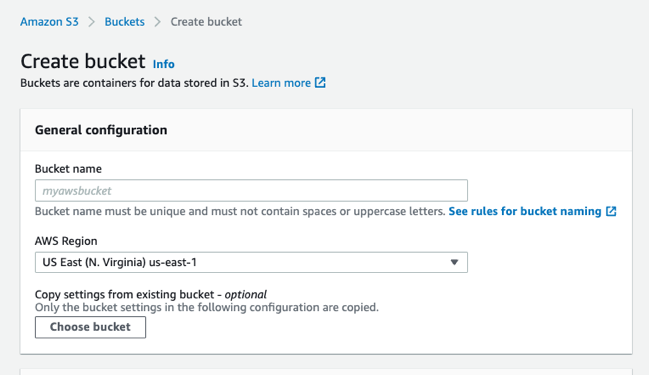
Enter a name for your new S3 bucket in Bucket name.
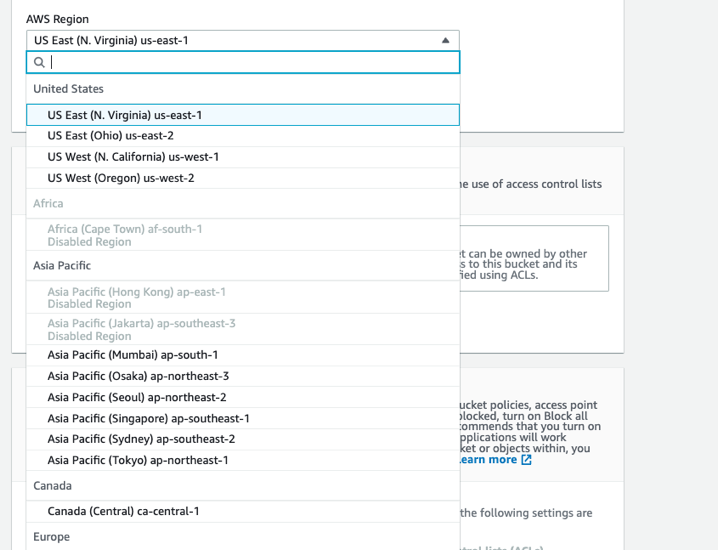
Select an AWS Region for your S3 bucket from the dropdown.
Select all other default settings, or specify your requirements.
Click Create bucket.
2. Create a CloudTrail for Monitoring your AWS Environment
Ensure that you have a CloudTrail available for monitoring AWS activity for your account. CloudTrail stores multiple events in a log file. This log file is delivered into the specified AWS S3 bucket. Lacework utilizes CLoudTrail log files for monitoring your AWS cloud environment.
Log in to your AWS account.
Go to the CloudTrail dashboard.
Click Create trail.
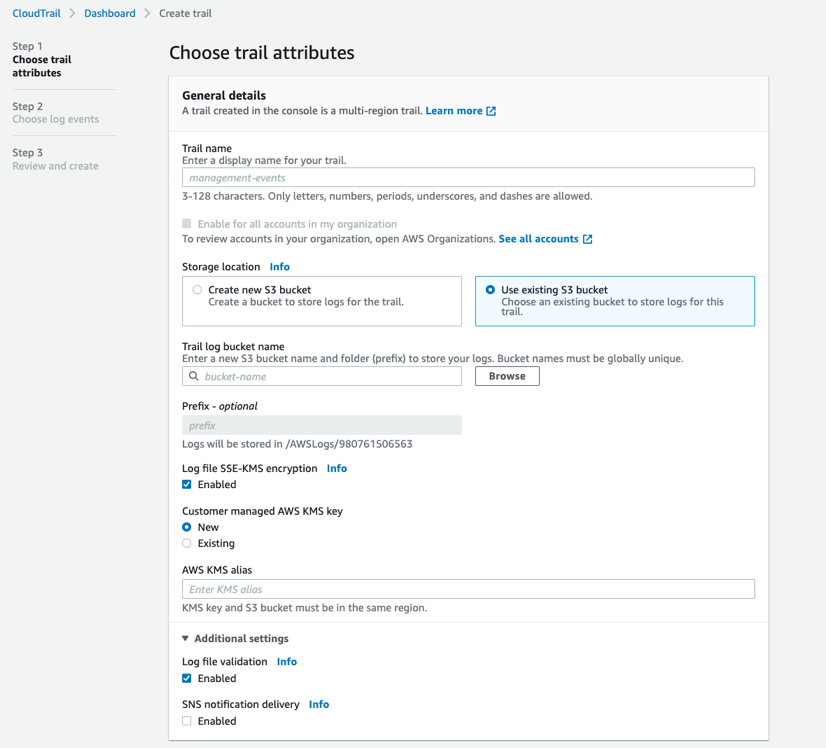
In the Trail name field, enter a name for your new CloudTrail.
Select Use existing S3 bucket.
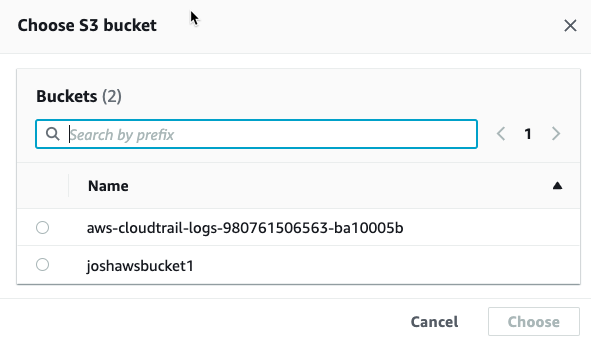
Click Browse to select the S3 bucket to store CloudTrail log files from the dropdown list.
In the Event type section, select Management events.
Lacework ingests management events only, see Log Types for more information.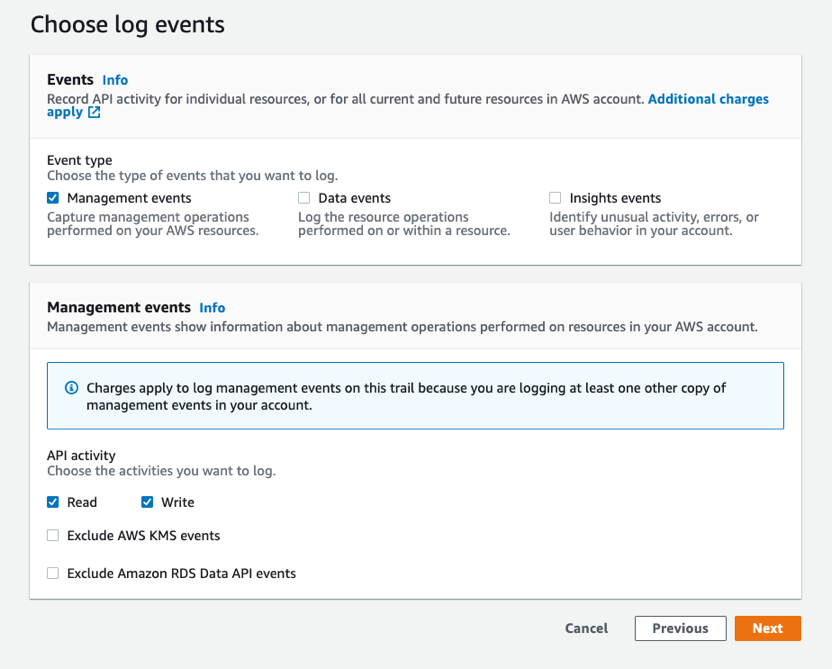
Select the types of management event API activity you want to log in your CloudTrail: Read, Write, Exclude AWS KMS events and/or Exclude Amazon RDS Data API events.
Click Next to proceed with your CloudTrail creation.
Review your CloudTrail configuration.
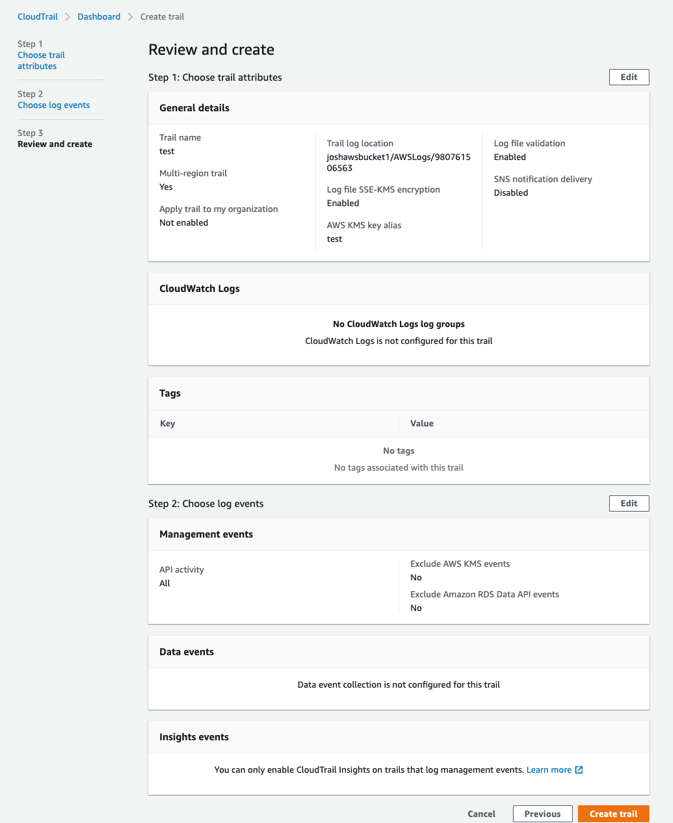
Click Create trail.
3. Enable SNS Notification Delivery for CloudTrail
You can enable SNS notification delivery for any CloudTrail writing data to your central AWS S3 bucket. A notification is sent to the SNS topic for every log file delivered to your S3 bucket.
Log in to your AWS account.
Go to the CloudTrail dashboard. A list of CloudTrails appears in your account.
Select a CloudTrail to monitor and enable SNS Notification.
Click Edit.

Select Enabled for the SNS notification delivery option.
Select Existing for the Create a new SNS topic to use the SNS topic created in a previous task.
Select the new SNS topic created earlier from the dropdown list, or enter the ARN for the new SNS topic.
Click Save changes.
4. Set Up the SQS Queue
Amazon Simple Queue Service (SQS) is a message queue service used by distributed applications to exchange messages through a polling model and can be used to decouple sending and receiving components—without requiring each component to be concurrently available. Using Amazon SNS and Amazon SQS together, messages can be delivered to applications that require immediate notification of an event, and also persisted in an Amazon SQS queue for other applications to process at a later time. An SQS queue is required for all AWS CloudTrail integrations monitored by Lacework.
1. Create an SQS Queue
Ensure that you have an SQS queue available for integrating with Lacework.
- Log in to your AWS account.
- Go to the Amazon Simple Queue Service page.
- Click Create queue to create a new SQS queue .
- Select the Standard type of queue.
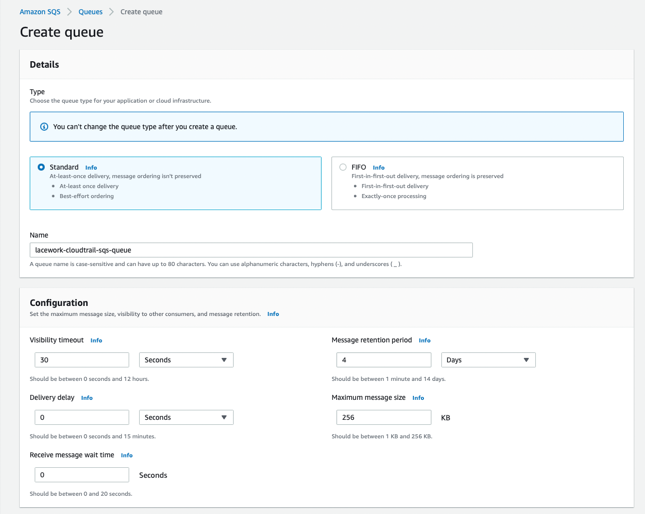
- Enter a name for the new queue.
- Accept the default values for your queue or configure for your specific requirements if necessary.
- Click Create queue. Details of the new SQS queue appear, along with the ARN and URL for the topic.
- Copy or record the ARN and URL for the new queue. You will need the ARN for the next step, and you will need the URL when you configure integration from the Lacework Console.
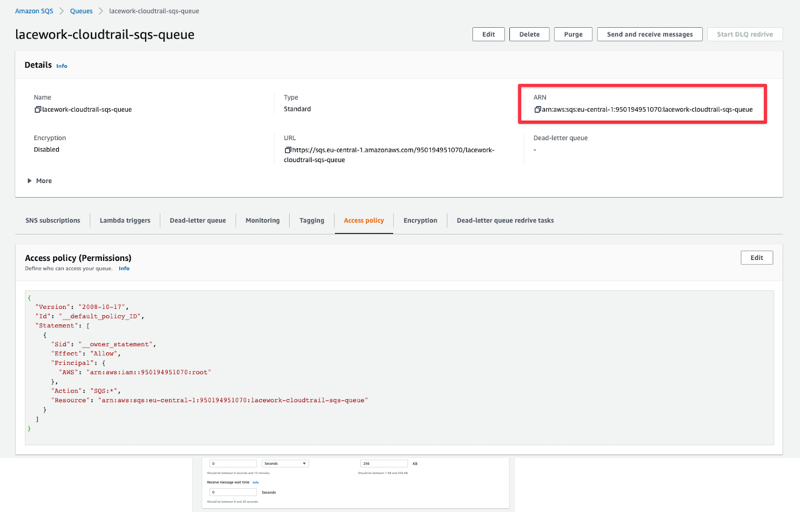
2. Configure the Access Policy for your SQS Queue
Select the Access policy tab for your SQS queue.
Click the Edit option.
Copy the following code snippet and replace the existing policy code block (using the ARN you just recorded):
{
     "Version": "2012-10-17",
     "Id": "lacework_sqs_policy_d7b97eda",
     "Statement": [
         {
         "Sid": "AllowLaceworkSNSTopicToSendMessage",
         "Effect": "Allow",
         "Principal": {
             "AWS": "*"
         },
         "Action": "SQS:SendMessage",
         "Resource": "<ARN_of_SQS_Queue>",
         "Condition": {
             "ArnEquals": {
             "aws:SourceArn": "<ARN_of_SQS_Queue>"
             }
         }
         }
     ]
}
Click Save.
3. Subscribe your SQS Queue to your SNS Topic
Select the SNS Subscription tab for your SQS queue.
Click the Subscribe to Amazon SNS topic option.
Select the SNS topic you created in the previous task from the dropdown list, or paste the SNS topic ARN.
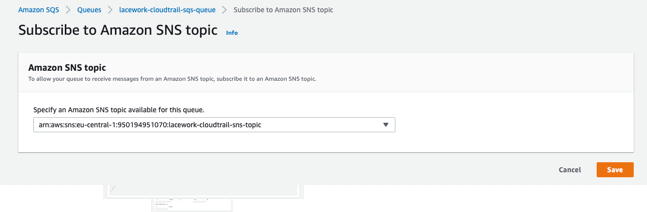
Click Save.
5. Create IAM Policies
To allow Lacework access to the required resources on your AWS environment, you must create 2 custom policies:
- CloudTrail Custom IAM policy
- Custom IAM Policy
1. Create a CloudTrail Custom IAM Policy
Create a custom policy that gives Lacework read-only access to ingest CloudTrail logs.
Log in to your AWS account.
Go to the Identity and Access Management (IAM) dashboard.
Click Policies in the left sidebar. A list of existing IAM policies appear.
Click Create Policy.
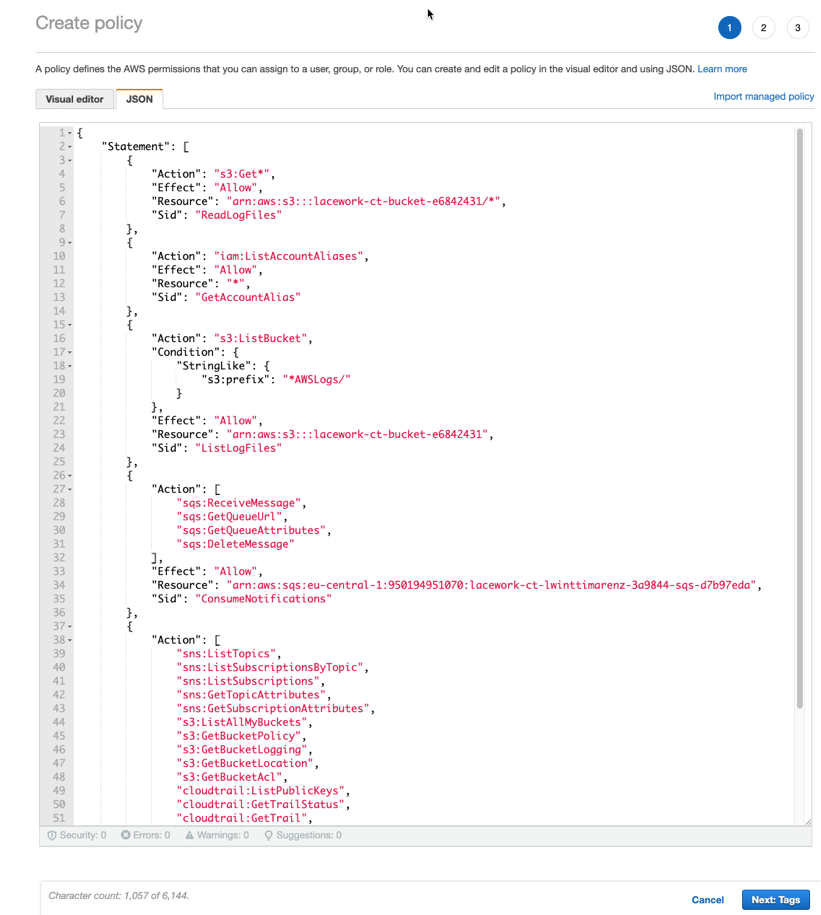
Select the JSON tab and paste the following code block snippet into the text box to define your new IAM policy for CloudTrail. Please add the missing ARNs before you go to the next step.
{
     "Statement": [
         {
             "Action": "s3:Get*",
             "Effect": "Allow",
             "Resource": "<ARN_for_S3_bucket>/*",
             "Sid": "ReadLogFiles"
         },
         {
             "Action": "iam:ListAccountAliases",
             "Effect": "Allow",
             "Resource": "*",
             "Sid": "GetAccountAlias"
         },
         {
             "Action": "s3:ListBucket",
             "Condition": {
                 "StringLike": {
                     "s3:prefix": "*AWSLogs/"
                 }
             },
             "Effect": "Allow",
             "Resource": "<ARN_for_S3_bucket>",
             "Sid": "ListLogFiles"
         },
         {
             "Action": [
                 "sqs:ReceiveMessage",
                 "sqs:GetQueueUrl",
                 "sqs:GetQueueAttributes",
                 "sqs:DeleteMessage"
             ],
             "Effect": "Allow",
             "Resource": "<ARN_for_SQS_Queue>",
             "Sid": "ConsumeNotifications"
         },
         {
             "Action": [
                 "sns:ListTopics",
                 "sns:ListSubscriptionsByTopic",
                 "sns:ListSubscriptions",
                 "sns:GetTopicAttributes",
                 "sns:GetSubscriptionAttributes",
                 "s3:ListAllMyBuckets",
                 "s3:GetBucketPolicy",
                 "s3:GetBucketLogging",
                 "s3:GetBucketLocation",
                 "s3:GetBucketAcl",
                 "cloudtrail:ListPublicKeys",
                 "cloudtrail:GetTrailStatus",
                 "cloudtrail:GetTrail",
                 "cloudtrail:DescribeTrails"
             ],
             "Effect": "Allow",
             "Resource": "*",
             "Sid": "Debug"
         }
     ],
     "Version": "2012-10-17"
}
Click Next to proceed with your policy creation.
Add tags you want to add any key-value pairs to AWS resources to identify them.
Click Next:Review to proceed with your policy creation.
Specify a policy name in Name and a brief description of your policy.
Click Create policy. Your new IAM policy appears in the list of policies for your AWS environment.
2. Create a Custom IAM Policy
Create a custom policy that extends SecurityAudit to enable read-only access to additional configuration resources:
Log in to your AWS account.
Go to the Identity and Access Management (IAM) dashboard.
Click Policies in the left sidebar. A list of existing IAM policies appear.
Click Create Policy.
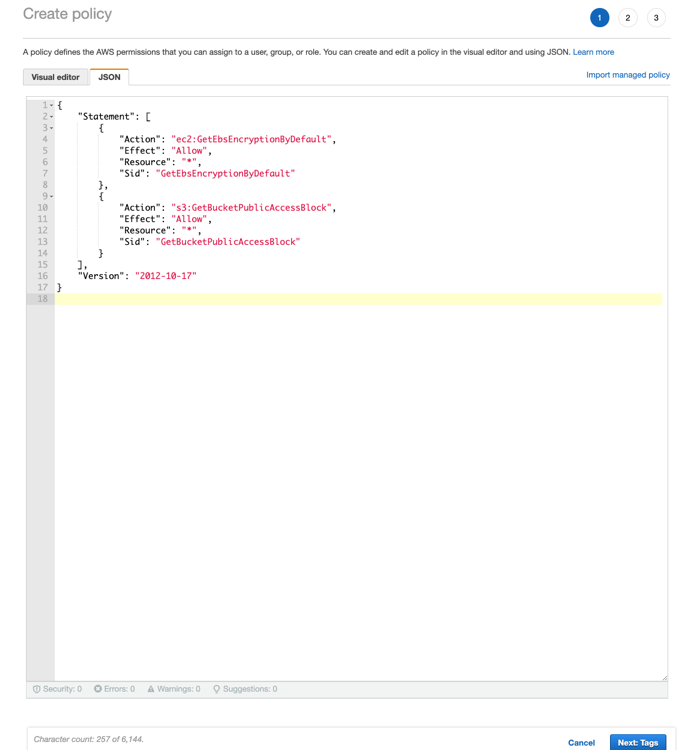
Select the JSON tab and paste the following code block snippet into the text box to define your new IAM policy for CloudTrail.
{
     "Statement": [
         {
             "Action": "ec2:GetEbsEncryptionByDefault",
             "Effect": "Allow",
             "Resource": "*",
             "Sid": "GetEbsEncryptionByDefault"
         },
         {
             "Action": "s3:GetBucketPublicAccessBlock",
             "Effect": "Allow",
             "Resource": "*",
             "Sid": "GetBucketPublicAccessBlock"
         }
     ],
     "Version": "2012-10-17"
}
Click Next to proceed with your policy creation.
Add tags you want to add any key-value pairs to AWS resources to identify them.
Click Next:Review to proceed with your policy creation.
Specify a policy name in Name and provide a brief description of your policy.
Click Create policy. Your new IAM policy appears in the list of policies for your AWS environment.
Cross-Account IAM Role
Lacework requires a cross-account role to access assessments of cloud resource configurations and for the analysis of CloudTrail events.
Create the Cross-Account IAM Role
- Log in to your AWS account.
- Go to the Identity and Access Management (IAM) dashboard.
- Click Roles in the left sidebar. A list of existing IAM roles appears.
- Click Create role.
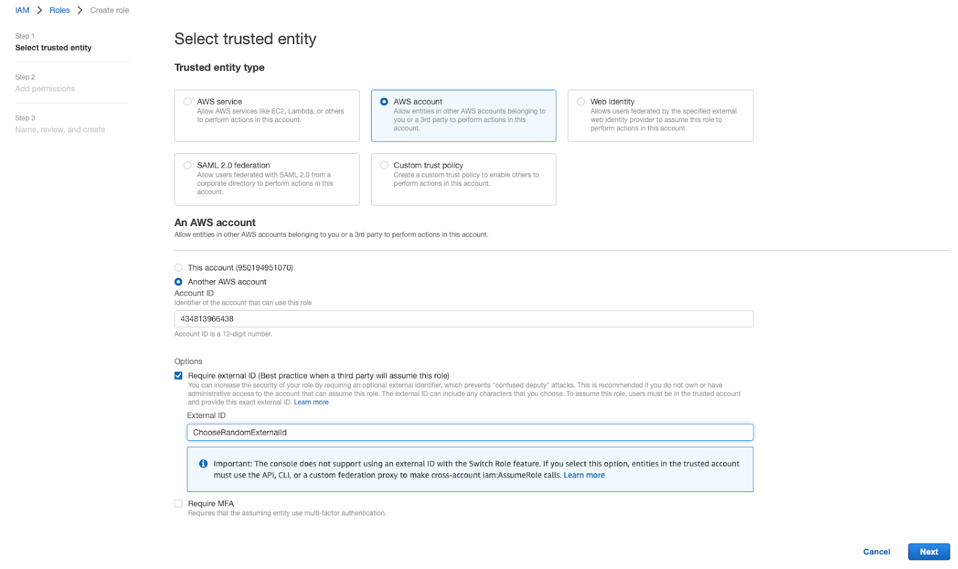
- Select AWS account as the Trusted entity type.
- Select Another AWS Account and set the Account ID to
434813966438. This identifier is the Lacework Account ID. - Click Next to proceed with the role creation.
- Select Require external ID (Best practice when a third party will assume this role) and use an External ID of your choice. External ID usage is for delegate access when a third party requires access to your AWS resources, such as Lacework.
- Copy or record this External ID. You will need this information when you integrate into the Lacework Console.
- Click Next to proceed with your role creation. The Add permissions page appears.
- Find and select the AWS managed policy
SecurityAuditto add to this new role. - Find and select the custom CloudTrail IAM policy you created earlier to add to this new role.
- Find and select the custom IAM policy you created earlier to add to this new role.
- Specify a role name in Role Name and a brief description of your policy.
- Click Create role.
- Copy or record the ARN for this cross-account role. You will need this information when you integrate into the Lacework Console.
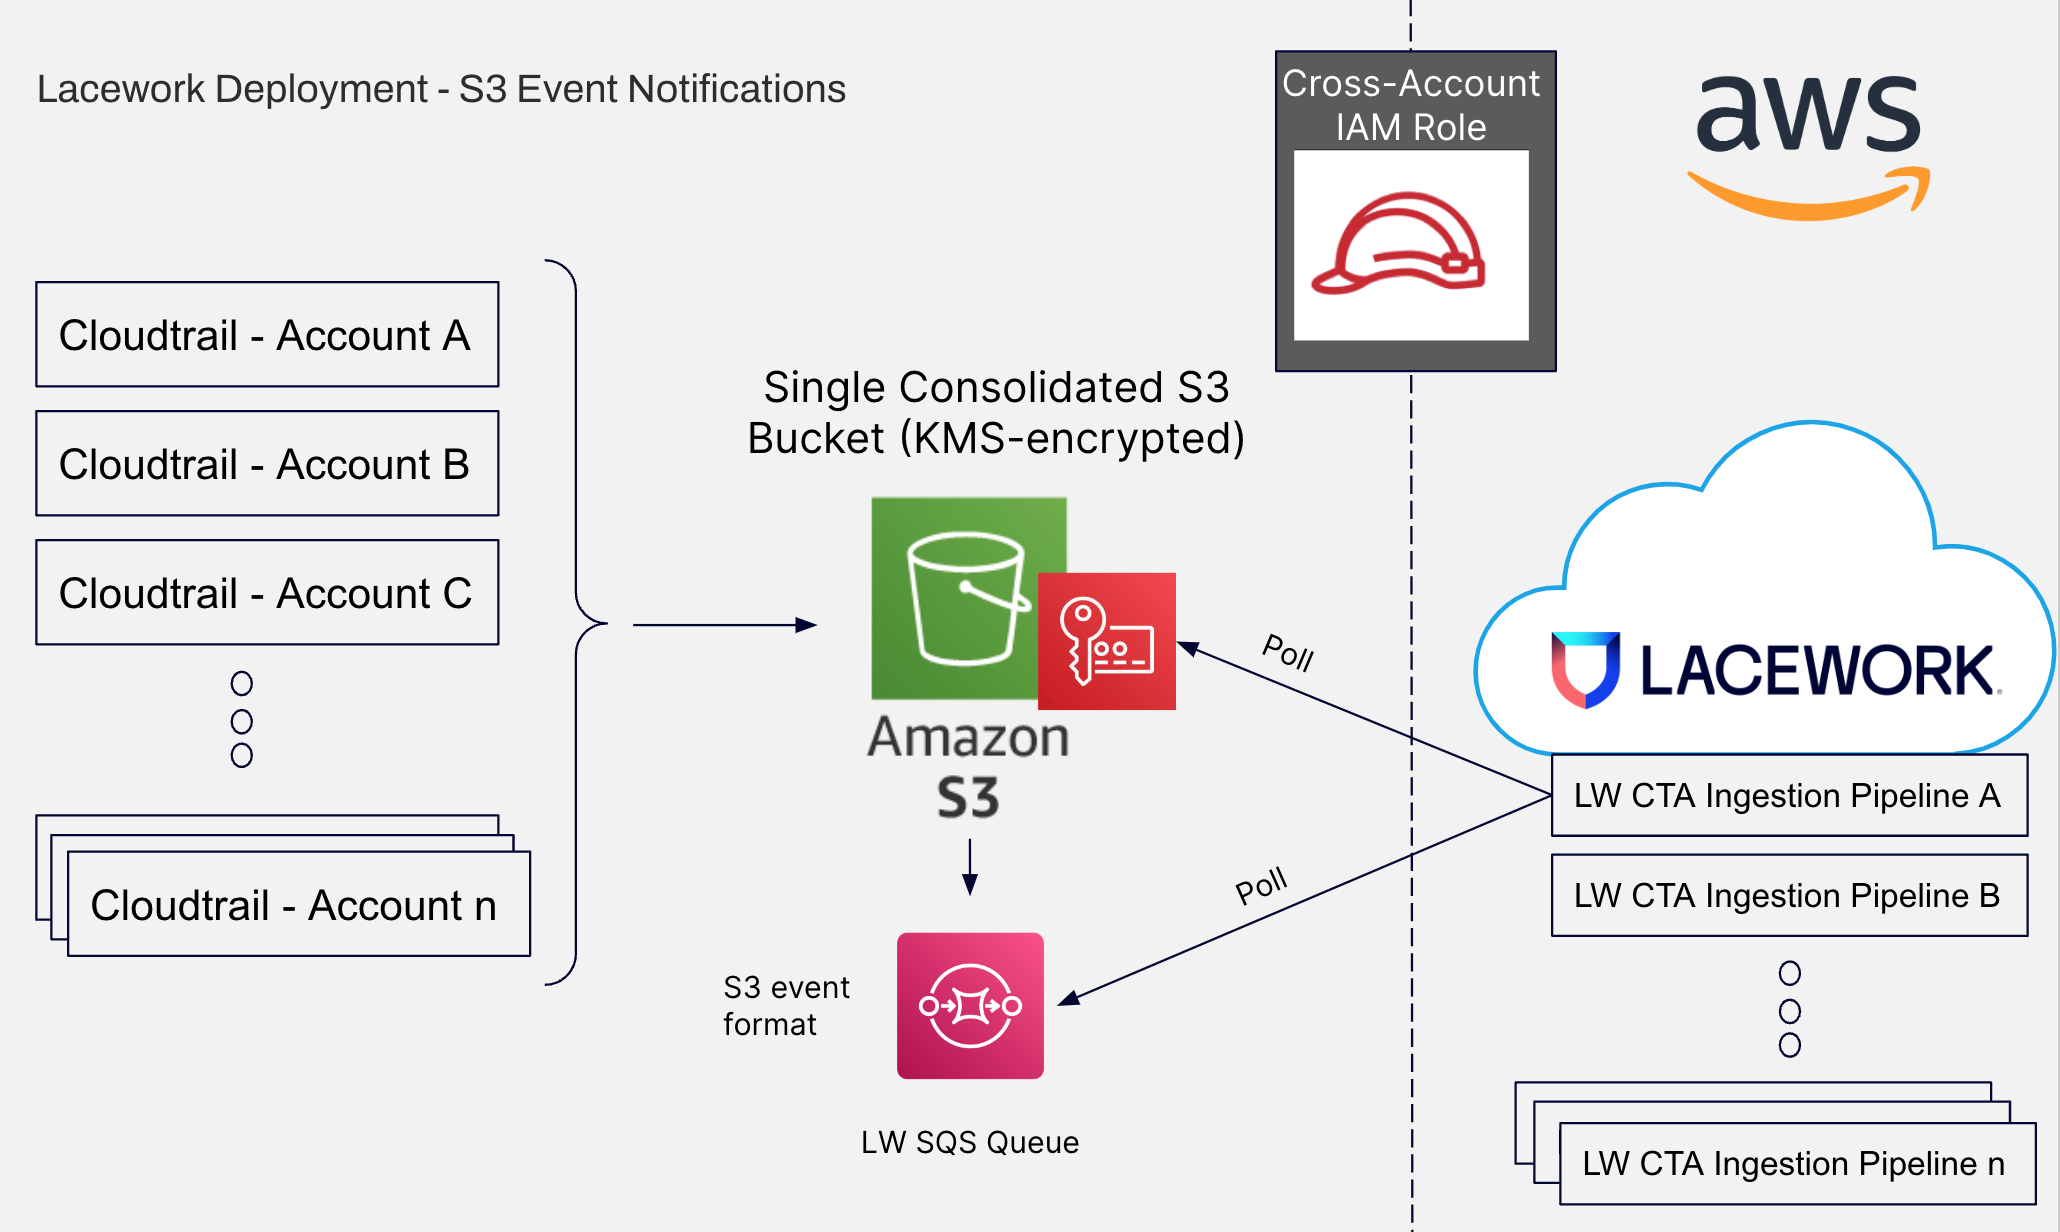
S3 Event Notifications
The following diagram shows a simple presentation of the AWS integration using S3 event notifications.
1. Set Up the SQS Queue To Receive Notifications From the S3 Bucket
To grant Amazon S3 permissions to publish messages to the SQS queue, attach an AWS Identity and Access Management (IAM) policy to the destination SQS queue. See IAM policy for a destination SQS queue.
2. Enable and Configure the S3 Bucket To Send Notifications to the SQS Queue
You can enable certain Amazon S3 bucket events to send a notification message to a destination whenever those events occur.
Sign in to the AWS Management Console and open the Amazon S3 console.
In the Buckets list, choose the name of the bucket that you want to enable events for.
Choose Properties.
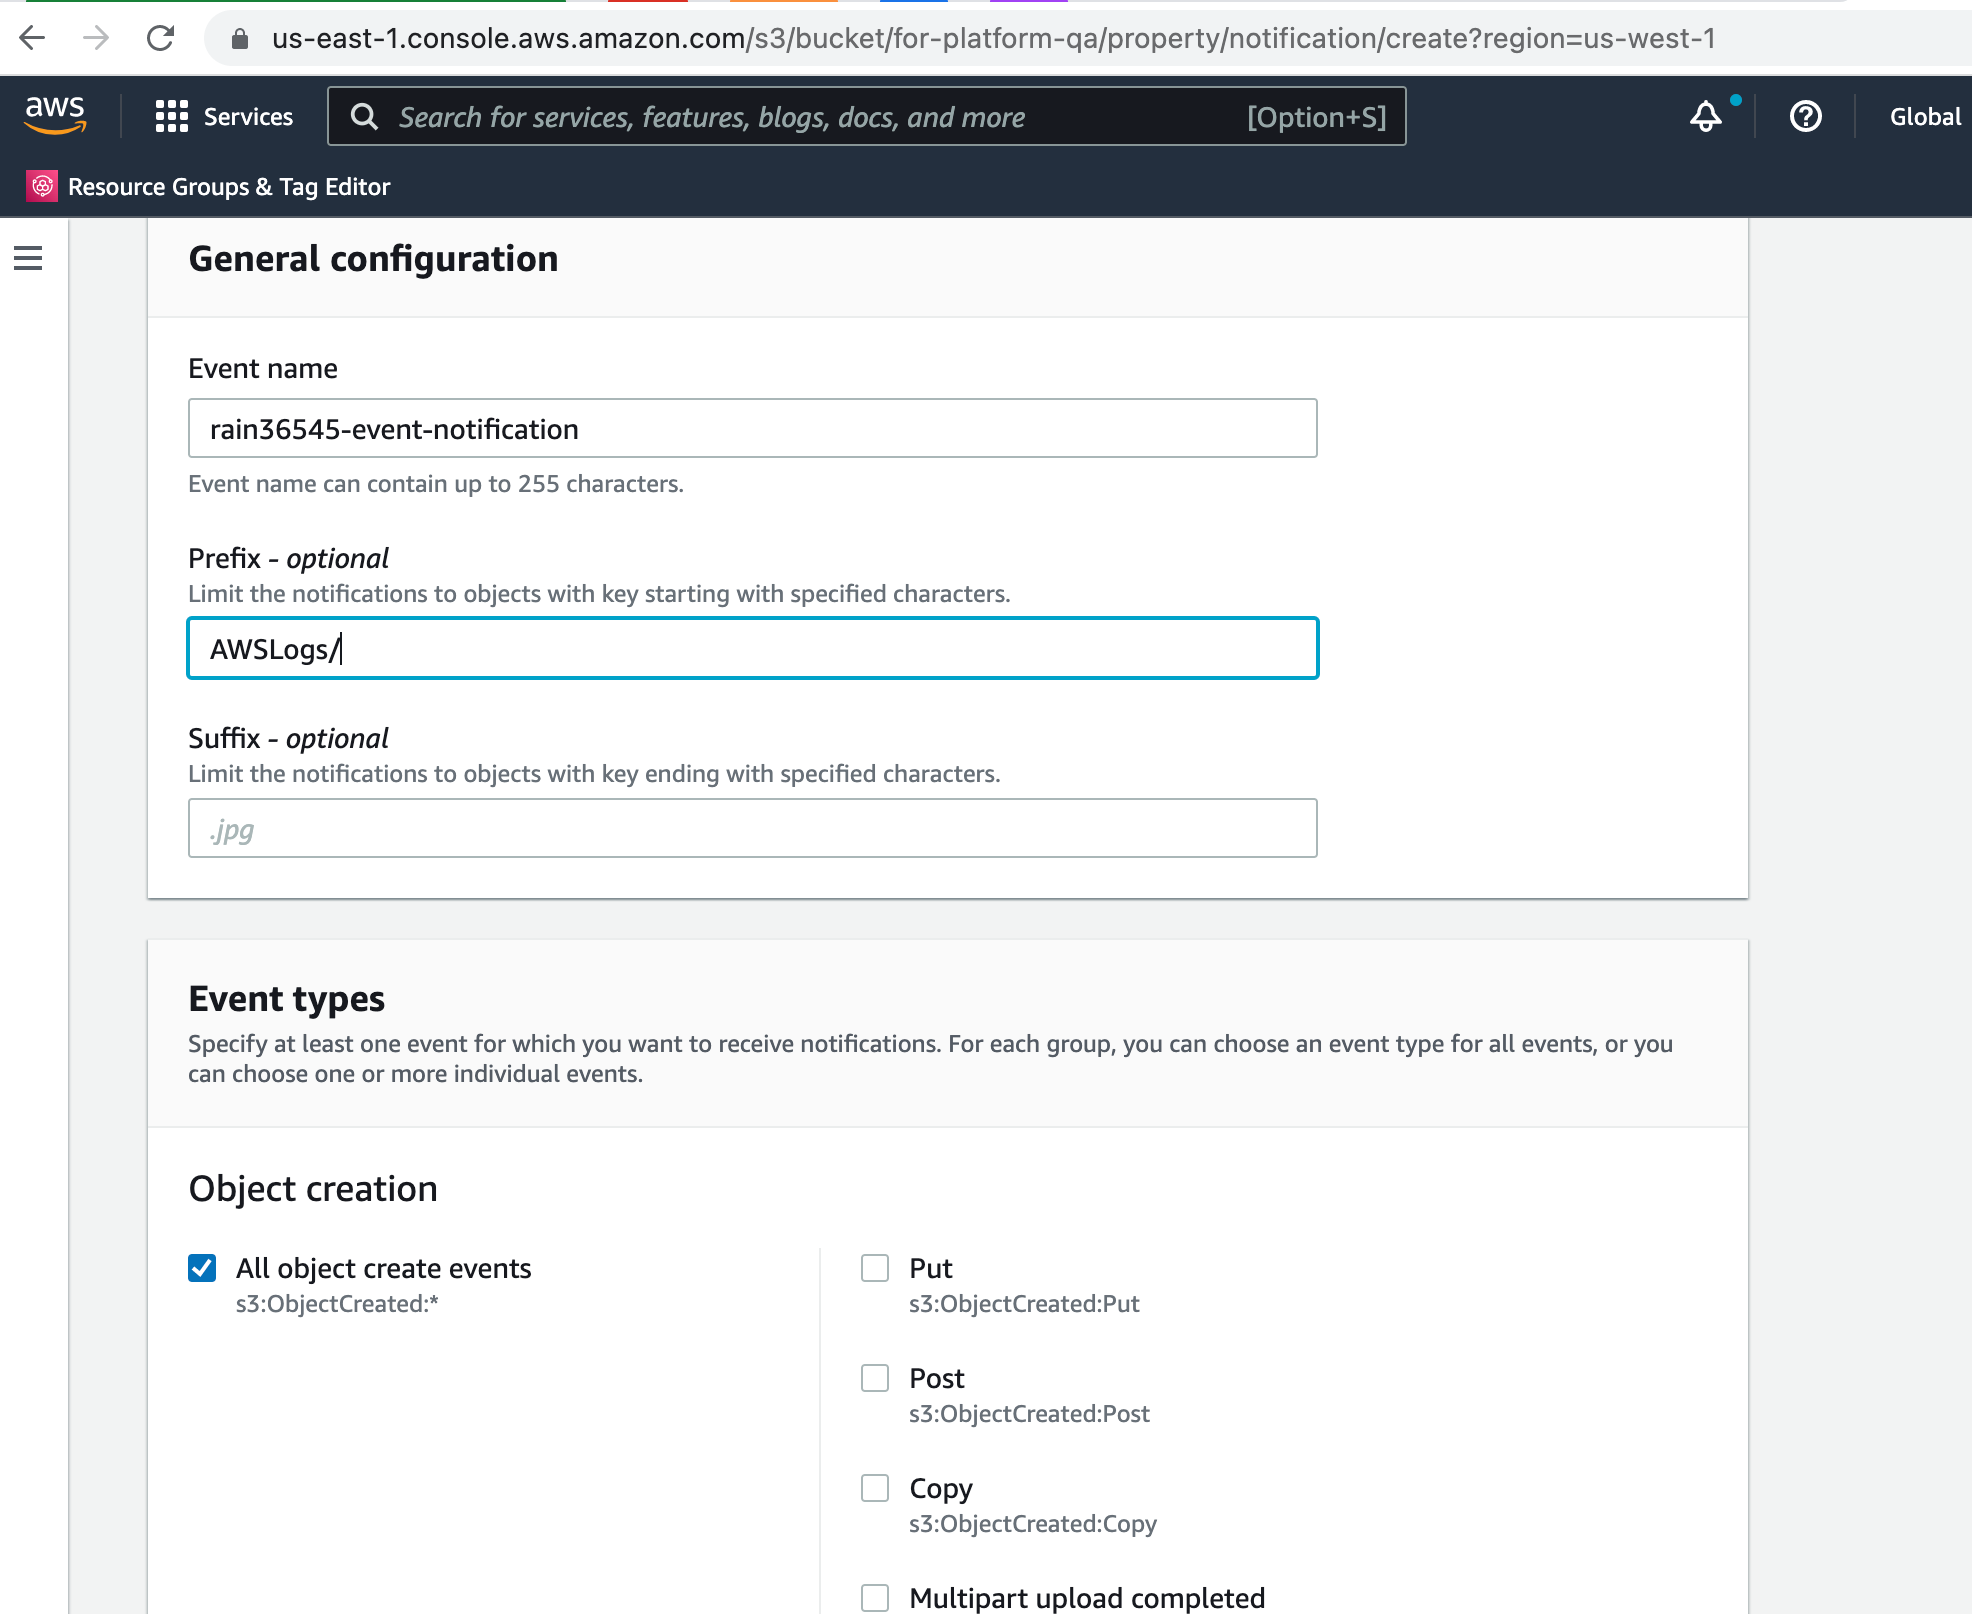
Go to the Event Notifications section and choose Create event notification.
In the General configuration section, specify a descriptive event name for your event notification. Optionally, you can also specify a prefix and a suffix to limit the notifications to objects with keys ending in the specified characters.
a. Enter a description for the Event name. If you don't enter a name, a globally unique identifier (GUID) is generated and used for the name.
b. (Optional) To filter event notifications by prefix, enter a Prefix.
For example, you can set up a prefix filter so that you receive notifications only when files are added to a specific folder (for example,AWSLogs/).
c. (Optional) To filter event notifications by suffix, enter a Suffix.In the Event types section, select s3:ObjectCreated:*.
In the Destination section, choose the event notification destination.
a. Select the destination type as SQS Queue .
b. After you choose your destination type, choose a queue from the list.
c. Or, if you prefer to specify an Amazon Resource Name (ARN), select Enter SQS queue ARN and enter the ARN.Choose Save changes, and Amazon S3 sends a test message to the event notification destination.
3. Create IAM Policies
To allow Lacework access to the required resources on your AWS environment, you must create 2 custom policies:
- CloudTrail Custom IAM policy
- Custom IAM Policy
Create a CloudTrail Custom IAM Policy
Create a custom policy that gives Lacework read-only access to ingest CloudTrail logs:
Log in to your AWS account.
Go to the Identity and Access Management (IAM) dashboard.
Click Policies in the left sidebar. A list of existing IAM policies appear.
Click Create Policy.
Select the JSON tab and paste the following code block snippet into the text box to define your new IAM policy for CloudTrail. Please add the missing ARNs before you go to the next step.
{
   "Statement": [
      {
            "Action": "s3:Get*",
            "Effect": "Allow",
            "Resource": "<ARN_for_S3_bucket>/*",
            "Sid": "ReadLogFiles"
      },
      {
            "Action": "iam:ListAccountAliases",
            "Effect": "Allow",
            "Resource": "*",
            "Sid": "GetAccountAlias"
      },
      {
            "Action": "s3:ListBucket",
            "Condition": {
               "StringLike": {
                  "s3:prefix": "*AWSLogs/"
               }
            },
            "Effect": "Allow",
            "Resource": "<ARN_for_S3_bucket>",
            "Sid": "ListLogFiles"
      },
      {
            "Action": [
               "sqs:ReceiveMessage",
               "sqs:GetQueueUrl",
               "sqs:GetQueueAttributes",
               "sqs:DeleteMessage"
            ],
            "Effect": "Allow",
            "Resource": "<ARN_for_SQS_Queue>",
            "Sid": "ConsumeNotifications"
      },
      {
            "Action": [
               "s3:ListAllMyBuckets",
               "s3:GetBucketPolicy",
               "s3:GetBucketLogging",
               "s3:GetBucketLocation",
               "s3:GetBucketAcl",
               "cloudtrail:ListPublicKeys",
               "cloudtrail:GetTrailStatus",
               "cloudtrail:GetTrail",
               "cloudtrail:DescribeTrails"
            ],
            "Effect": "Allow",
            "Resource": "*",
            "Sid": "Debug"
      }
   ],
   "Version": "2012-10-17"
}
Click Next to proceed with your policy creation.
Add tags you want to add any key-value pairs to AWS resources to identify them.
Click Next:Review to proceed with your policy creation.
Specify a policy name in Name and a brief description of your policy.
Click Create policy. Your new IAM policy appears in the list of policies for your AWS environment.
Create a Custom IAM Policy
For steps to create a custom IAM policy, see 2. Create a Custom IAM Policy.
Cross-Account IAM Role
For steps to create a cross-account IAM role, see Cross-Account IAM Role.
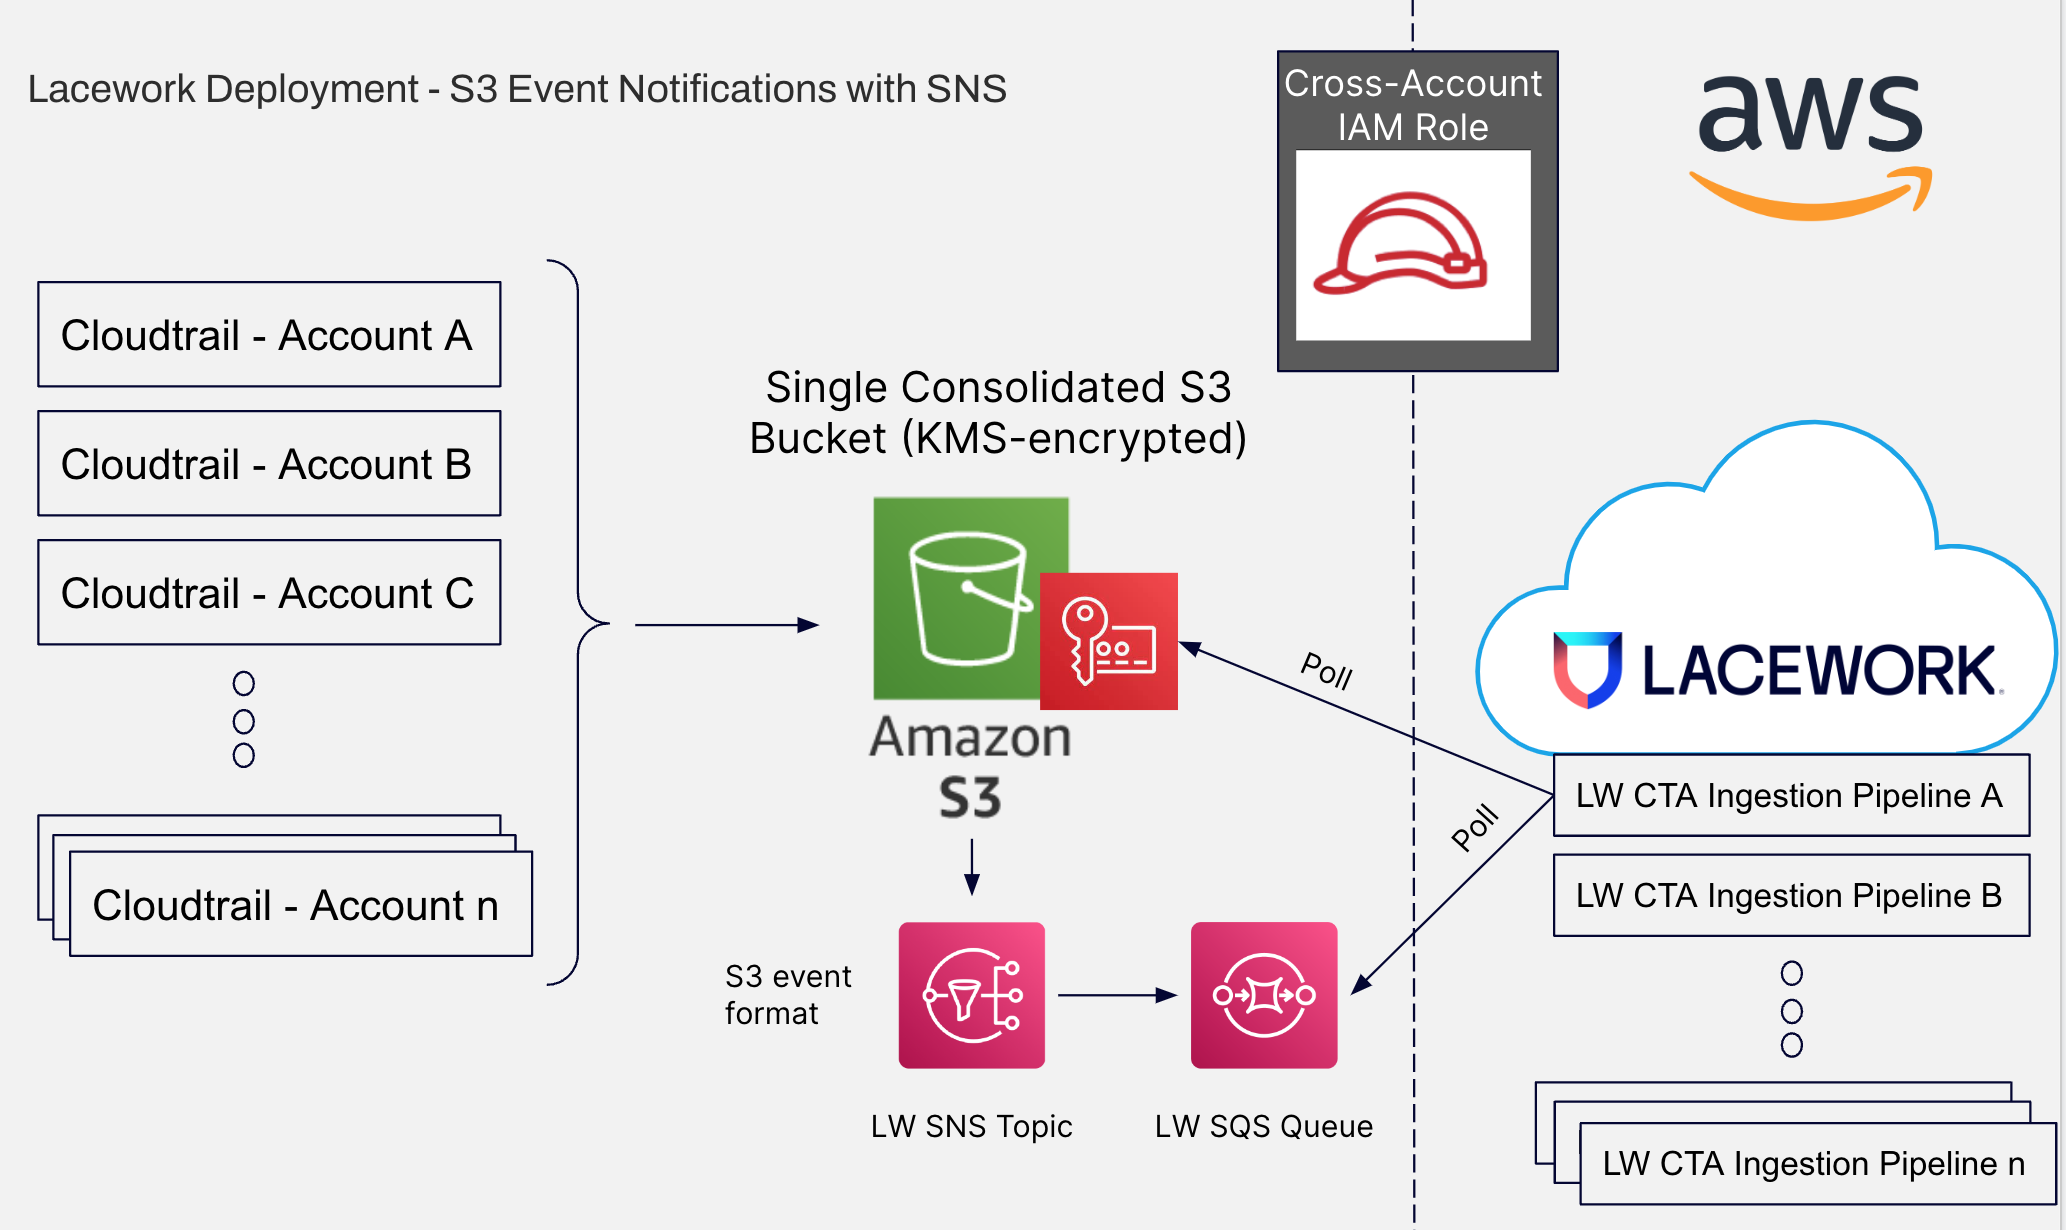
S3 Event Notifications with SNS
The following diagram shows a simple presentation of the AWS integration with S3 event notifications and SNS.
1. Create an SNS Topic
An SNS topic is a communication channel for SQS queue messaging from your AWS environment to Lacework.
If you already have an SNS topic for integration, copy or record the Amazon Resource Name (ARN) for the topic. If you do not have an SNS topic, follow the steps mentioned in 1. Create an SNS Topic to create one.
2. Set Up the SQS Queue
3. Set Up the SNS Topic To Receive Notifications From the S3 Bucket
You must grant the Amazon S3 principal the necessary permissions to call the relevant API to publish messages to an SNS topic. This is so that Amazon S3 can publish event notification messages to a destination.
The following is an example of an AWS Identity and Access Management (IAM) policy that you attach to the destination SNS topic.
{
    "Version": "2012-10-17",
    "Id": "example-ID",
    "Statement": [
        {
            "Sid": "Example SNS topic policy",
            "Effect": "Allow",
            "Principal": {
                "Service": "s3.amazonaws.com"
            },
            "Action": [
                "SNS:Publish"
            ],
            "Resource": "SNS-topic-ARN",
            "Condition": {
                "ArnLike": {
                    "aws:SourceArn": "arn:aws:s3:*:*:bucket-name"
                },
                "StringEquals": {
                    "aws:SourceAccount": "bucket-owner-account-id"
                }
            }
        }
    ]
}
For more information, see Granting permissions to publish event notification messages to a destination.
4. Enable and Configure Event Notifications Using the Amazon S3 Console
You can enable certain Amazon S3 bucket events to send a notification message to a destination whenever those events occur.
Sign in to the AWS Management Console and open the Amazon S3 console.
In the Buckets list, choose the name of the bucket that you want to enable events for.
Choose Properties.
Go to the Event Notifications section and choose Create event notification.
In the General configuration section, specify a descriptive event name for your event notification. Optionally, you can also specify a prefix and a suffix to limit the notifications to objects with keys ending in the specified characters.
a. Enter a description for the Event name. If you don't enter a name, a globally unique identifier (GUID) is generated and used for the name.
b. (Optional) To filter event notifications by prefix, enter a Prefix.
For example, you can set up a prefix filter so that you receive notifications only when files are added to a specific folder (for example,AWSLogs/).
c. (Optional) To filter event notifications by suffix, enter a Suffix.In the Event types section, select s3:ObjectCreated:*.
In the Destination section, choose the event notification destination.
a. Select the destination type as SNS Topic.
b. After you choose your destination type, choose a topic from the list.
c. Or, if you prefer to specify an Amazon Resource Name (ARN), select Enter SNS topic ARN and enter the ARN.Choose Save changes, and Amazon S3 sends a test message to the event notification destination.
5. Subscribe the SQS Queue to the SNS Topic
You can subscribe one or more SQS queues to an SNS topic. When you publish a message to a topic, the SNS sends the message to each of the subscribed queues. Amazon SQS manages the subscription and any necessary permissions. See Subscribing an Amazon SQS queue to an Amazon SNS topic (console).