GCP Audit Log Integration - Manual Configuration
To create a Lacework GCP Audit Log integration to gather, process, report, and alert on GCP Audit Log data, follow the steps in the procedure below. Note that you must create a separate GCP integration for reporting and alerting on GCP configuration compliance. For more information, see Integrate Lacework with GCP. You can, however, use the same credentials for both integrations.
When a GCP Audit Log integration is created, Lacework gathers the logs of administrative operations from GCP audit logs. GCP captures detailed audit log data and stores that data in audit logs. Lacework aggregates and organizes this audit log data into useful maps and dashboards that illustrate the following:
- conceptual relationships
- causes and effects
- interactions between GCP entities
Lacework uses StackDriver to get the GCP audit logs.
Lacework also automatically generates alerts whenever an audit log event represents a security risk.
Requirements
- Decide if you want to monitor the audit logs at the organization, folder, or project level. If you specify the option to include children when creating the sink at the organization or folder level, all the projects in the organization or the folder export the audit logs to the bucket.
- If you are already exporting your audit logs to a storage bucket, you can reuse that storage bucket but the project with the storage bucket must be granted role access as described in the procedure below.
- The procedure below requires that the jq utility is installed. The jq utility is a flexible command-line JSON processor. For more information, see https://stedolan.github.io/jq/.
Create a GCP Service Account and Grant Access
Follow the procedure in Create a GCP Service Account and Grant Access. You can skip this procedure if you have already created a service account and granted role access when creating a new GCP configuration integration. You can also reuse the same service account.
Enable the Required GCP APIs
When manually creating a GCP Audit Log integration, you must enable APIs for the GCP projects you want to integrate. Follow the procedure in Enable the Required GCP APIs.
Configure GCP for Audit Log Integration
This procedure configures the GCP Audit Log integration to ingest audit log data.
Verify that the jq (command-line JSON processor) utility is available from your command-line shell. Open a command-line window and enter the following command. If the jq utility is found, skip to step 3.
jqIf the jq utility is not installed or not listed in your PATH, install it (https://stedolan.github.io/jq/) and verify that the path to the utility is listed in your PATH environment variable. The jq utility is required for some of the steps in the following procedure.
If you do not have the GCP CLI installed on your system, install it. For more information, see CLOUD SDK. As part of the installation process, ensure you initialize gcloud with the following command:
gcloud init. Leave the CLI window open.Log in to the GCP Console.
Decide if you want to export the audit logs at the organization, folder, or project level. In addition, pick an entity to export audit logs from. An entity is either an organization, folder, or project. This entity must be granted access to the service account and must have the role access as described in Create a GCP Service Account and Grant Access. A project can have access because it was directly granted access or because its parent organization was granted access. Billing must also be enabled for any projects that you want to export audit logs from. Note that if you select the option to include children when creating the sink at the organization or folder level, all projects in the organization or the folder export the audit logs to the bucket.
Locate and get the ID of a GCP project where the bucket and sink will be created as described in steps 7 - 13. In addition, if you decide to export at the project level, this is the project that will export its audit logs.
Click the down arrow in the top menu bar.

The Select from dialog appears.From the Select from the drop-down, select an organization that contains the GCP project to monitor audit logs.
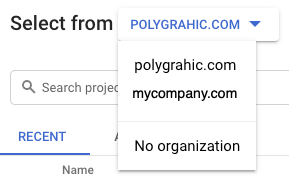
Select the All tab.
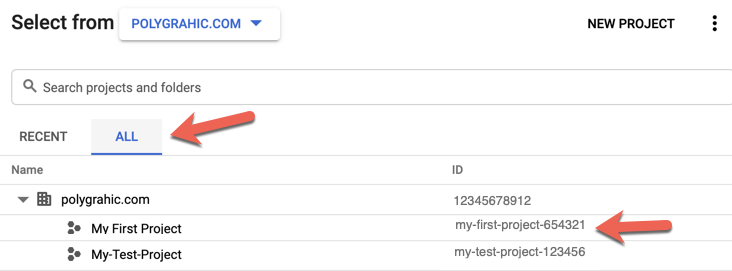
Locate the GCP project.
From the ID column, copy the Project ID.
In the CLI window, enter the following text:
projectName=Paste the ID of the project that will monitor audit logs and enter return. Replace my-first-project-654321 with your project ID.
projectName=my-first-project-654321Set the current project by entering the following command. If Updated property [core/project] is not returned, make sure the quotes are straight double-quotes. Use straight quotes for all the CLI commands in this procedure.
gcloud config set project "$projectName"Create a storage bucket in the project. Replace mybucketname with your bucket name.
bucketName=mybucketname
gsutil mb "gs://$bucketName"
Set the name of sink. Replace mysink with your sink name.
sinkName=mysinkCreate the sink. Decide if you want to export the audit logs at the organization, folder, or project level and create the sink. If creating the sink at the organization level, add
\ --include-children --organization=myorganizationidto the end of the following command. If creating the sink at the folder level, add\ --include-children --folder=myfolderidto the end of the following command. If you specify the\ --include-childrenoption when creating the sink at the organization or folder level, all the projects in the organization or the folder export audit logs to the bucket.gcloud logging sinks create "$sinkName" "storage.googleapis.com/$bucketName" --log-filter '(protoPayload.@type=type.googleapis.com/google.cloud.audit.AuditLog) AND NOT (protoPayload.serviceName="k8s.io") AND NOT (protoPayload.serviceName:"login.googleapis.com") AND NOT (protoPayload.methodName:"storage.objects")'Copy the service account returned by the previous command. Copy the text between the single quotes. In the following example, the text to copy is italicized. The next two steps grants the objectViewer role on the bucket. In a later step, you grant Storage Object Creator role on the bucket.
Please remember to grant `serviceAccount:123567@gcp-sa-logging.iam.gserviceaccount.com` the Storage Object Creator role on the bucket.Enter sinkServiceAccount=, paste the text and enter return.
sinkServiceAccount=serviceAccount:123567@gcp-sa-logging.iam.gserviceaccount.comGrant bucket read permissions to the service account returned by the preceding sink create command.
gsutil iam ch "$sinkServiceAccount:objectViewer,objectCreator" "gs://$bucketName"Create the pubsub topic under the project for Audit log file notifications. Replace mytopic with your topic name.
topicName=mytopic
gcloud config set project "$projectName"
gcloud pubsub topics create "$topicName"
If this is a new project, you must grant the GCP-managed service account sufficient privileges to publish to the log integration pubsub topic. Get the name of the GCP-managed service account that is created when a new project is created. This service account is in the format:
service-YourProjectNumber@gs-project-accounts.iam.gserviceaccount.com.gcloud pubsub topics add-iam-policy-binding "projects/$projectName/topics/$topicName" --member=serviceAccount:service-$(gcloud projects describe $projectName --format='value(projectNumber)')@gs-project-accounts.iam.gserviceaccount.com --role=roles/pubsub.publisherConfigure the storage bucket to send notifications to pubsub. This also configures the topic policy to allow publishing from the bucket.
gsutil notification create -e OBJECT_FINALIZE -f json -t "projects/$projectName/topics/$topicName" "gs://$bucketName"Create the pubsub subscription (queue) for the audit log file notification topic created in the previous step. Replace mytopicsub with your topic subscription name.
topicSubscriptionName=mytopicsub
gcloud pubsub subscriptions create "$topicSubscriptionName" --topic "$topicName" --ack-deadline=300
Grant bucket read permissions to the service account that you granted role access in Create a GCP Service Account and Grant Access. This is not the service account returned by the sink create command above. Replace the service account name with the fully qualified service account name. Note that the string
serviceAccount:must preface the service account name.serviceAccount=serviceAccount:myserviceaccount@myloggingproject.iam.gserviceaccount.com
gsutil iam ch "$serviceAccount:objectViewer" "gs://$bucketName"Grant the integration service account the subscriber role on the subscription. If prompted to install a command group, answer y.
gcloud pubsub subscriptions add-iam-policy-binding "projects/$projectName/subscriptions/$topicSubscriptionName" --member="$serviceAccount" --role=roles/pubsub.subscriberEnter the following command to get the subscription path that is used when creating the integration in the Lacework Console.
echo "projects/$projectName/subscriptions/$topicSubscriptionName"Copy the resulting subscription path returned by the echo command for use in the next procedure that creates the integration.
note
If you are setting up new Google audit logging (instead of leveraging existing Google audit logging), Lacework recommends that you set a retention policy with a minimum of 7 days.
Create the GCP Audit Log Integration on the Lacework Console
Navigate to Manual Integration
- Log in to the Lacework Console.
- Go to Settings > Integrations > Cloud accounts.
- Click + Add New.
- Click Google Cloud Platform and select Audit Log to analyze GCP Audit Logs.
- Click Next.
- Click Manual Configuration and follow the steps in Create an Audit Log Integration.
Create an Audit Log Integration
- Create a GCP service account and grant access.
- Enable the required GCP APIs.
- Configure GCP for Audit Log integration.
- For Name, enter a unique name that displays in the Lacework Console.
- Follow the steps to either upload GCP credentials or enter information manually.
When creating the GCP integration, you can either upload GCP credentials or enter all information manually. Finish creating the integration in the Lacework Console by following the steps described in one of the following sections.
Upload GCP Credentials
To upload GCP credentials, follow these steps:
For Upload GCP Credential, click Choose File and navigate to the JSON key file downloaded when you created the GCP service account.
This populates the credential fields.For Integration Level, select Organization or Project. Select Organization if integrating at the organization level. Select Project if integrating at the project level.
For Org/Project ID, paste in the appropriate ID value for your integration type:
If integrating at the project level, copy and paste the value of the project_id property from the JSON file.
If integrating at the organization level, log in to the GCP console. Click the down arrow in the top menu bar. From the Select from the drop-down, select an organization that contains the GCP project(s) that you want the integration to monitor. Select IAM & admin > Settings and copy and paste the number from the Organization ID field.
For Subscription Name, paste the subscription path that was copied in an earlier step. The subscription path is in the following format:
projects/$projectName/subscriptions/$topicSubscriptionNameClick Save to finish the GCP integration and save your onboarding progress. The integration appears in the list of cloud accounts under Cloud accounts.
For the “Integration Pending” status, hover over the status text and click the refresh icon to fetch the status result again. This does not retest the integration.
Enter Information Manually
To manually enter GCP credentials when adding a GCP Audit Log, follow these steps:
Verify that the jq (command-line JSON processor) utility is available from your command-line shell. Leave this command-line window open.
jqIf the jq utility is found, skip to the next step. If the jq utility is not installed or not listed in your PATH, install it (https://stedolan.github.io/jq/) and verify that the path to the utility is listed in your PATH environment variable. The jq utility is required for some steps in the following procedure.
Locate the JSON file downloaded when you created the GCP service account.
Open the file in an editor and leave it open.
Copy the value of the client_id property from the JSON file and paste the value into the Client ID field of the Lacework Console.
Copy the value of the private_key_id property from the JSON file and paste the value into the Private Key ID field of the Lacework Console.
Copy the value of the client_email property from the JSON file and paste the value into the Client Email field of the Lacework Console.
Exit the editor.
You cannot just copy the private key from the editor because of an issue copying the new line characters. You must copy a raw version of the key using the “jq” utility as described in the next steps.
To view the private key raw text, enter the following command, where YourFileName.json is the name of the file downloaded when you created the GCP Service Account.
cat YourFileName.json | jq -r '.private_key'Copy all text displayed in the output including the BEGIN and END lines.
-----BEGIN PRIVATE KEY-----
YourKeyInfo
-----END PRIVATE KEY-----
Paste the text into the Private Key field of the Lacework Console.
From the Integration Level drop-down, select Organization or Project. Select Organization if integrating at the organization level. Select Project if integrating at the project level.
Copy the appropriate value for your integration type as described in the next two steps.
If integrating at the project level, copy the value of the project_id property from the JSON file into the Org/Project ID field of the Lacework Console.
If integrating at the organization level, log in to the GCP console. Click the down arrow in the top menu bar. From the Select from the drop-down, select an organization that contains the GCP project(s) that you want the integration to monitor. Select IAM & admin > Settings and copy the number from the Organization ID field and paste the value into the Org/Project ID field of the Lacework Console.
Paste the subscription path that was copied in an earlier step into the Subscription Name field. The subscription path is in the following format:
projects/$projectName/subscriptions/$topicSubscriptionNameClick Save to finish the GCP integration and save your onboarding progress. The integration appears in the list of cloud accounts under Cloud accounts.
For the “Integration Pending” status, hover over the status text and click the refresh icon to fetch the status result again. This does not retest the integration.